- Products
- Learn
- Local User Groups
- Partners
- More

This website uses Cookies. Click Accept to agree to our website's cookie use as described in our Privacy Policy. Click Preferences to customize your cookie settings.
- Products
- Learn
- Local User Groups
- Upcoming Events
- Americas
- EMEA
- Czech Republic and Slovakia
- Denmark
- Netherlands
- Germany
- Sweden
- United Kingdom and Ireland
- France
- Spain
- Norway
- Ukraine
- Baltics and Finland
- Greece
- Portugal
- Austria
- Kazakhstan and CIS
- Switzerland
- Romania
- Turkey
- Belarus
- Belgium & Luxembourg
- Russia
- Poland
- Georgia
- DACH - Germany, Austria and Switzerland
- Iberia
- Africa
- Adriatics Region
- Eastern Africa
- Israel
- Nordics
- Middle East and Africa
- Balkans
- Italy
- Bulgaria
- Cyprus
- APAC
- Partners
- More
- ABOUT CHECKMATES & FAQ
- Sign In
- Leaderboard
- Events
Step Into the Future of
AI-Powered Cyber Security
The State of Ransomware Q1 2026
Key Trends and Their Impact
AI Security Masters E8:
Claude Mythos: New Era in Cyber Security
Blueprint Architecture for Securing
The AI Factory & AI Data Center
Call For Papers
Your Expertise. Our Stage
CheckMates Go:
CheckMates Fest
Turn on suggestions
Auto-suggest helps you quickly narrow down your search results by suggesting possible matches as you type.
Showing results for
Who rated this post
Turn on suggestions
Auto-suggest helps you quickly narrow down your search results by suggesting possible matches as you type.
Showing results for
- Mark as New
- Bookmark
- Subscribe
- Mute
- Subscribe to RSS Feed
- Permalink
- Report Inappropriate Content
New -Easy Migration from Azure Firewall to Check Point
Hi All,
I’m happy to share a small PowerShell script that will save you a ton of time when you decide to switch from Azure Firewall to Check Point CloudGuard Network Security.
The script will export your firewall policies on Azure, including all of its objects, to multiple CSV files.
Then, import the CSV files to your Check Point management machine.
At the end of the process, you will get all the objects and policies created on the Check Point management machine.
Depending on your policy size on Azure, the entire process, end to end, should not take more than 10 minutes.
The PowerShell script is attached to the end of the post.
Here is a quick how-to guide (At the end of this guide, you will also find a tutorial video)
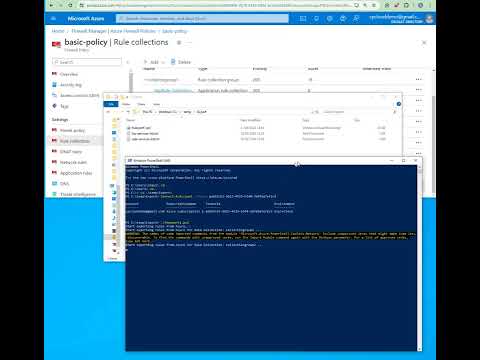
On the Azure Firewall, I have a firewall policy with five collection groups.
Each collection group consists of one or more rule sets (network rule collection and Application Rule collection)


When you run the PowerShell script, run it against all the collection groups at once.
First, download the attached zip file, and export its content to a temp directory.
Open the PowerShell script in Notepad++ and replace the values in rows 2, 3, and 4
The $fpname value should be replaced with the policy name.
The $fprg value should be replaced with the policy resource group.
The $fprcgname should be replaced with the collection group names.


Set your Check Point management username and password on rows 6 & 7.

Create a folder C:\temp\export
Save the file fwexport.txt to the new Folder, and ensure the extension is ps1.

Open PowerShell and log in to your Azure Tenet ( Connect-AzAccount –Tenant ‘tenant-id’ )


Switch the directory to C:\temp\export

Run the PowerShell script
The script will export the policy and create a tar file with multiple CSV files that include all the required objects. (Be patient; it might take a few minutes ….)


Two files will be created, *.tar & *.sh

Copy the two files to the home folder of the Check Point management machine.
Copy the two files to the home folder on the Check Point management.

Open SSH to the Check Point management machine ( switch to expert mode ) and run the command: bash import_rules.sh

The script will extract the tar file and import each one of the CSV files.

** If you prefer to import each file manually, you can extract the tar file and run the command below in the following order:
mgmt_cli add host --batch hosts-migrate.csv
mgmt_cli add network --batch subnets-migrate.csv
mgmt_cli add address-range --batch ipranges-migrate.csv
mgmt_cli add dns-domain --batch fqdn-migrate.csv
mgmt_cli add group --batch ipgroups-migrate.csv
mgmt_cli add access-layer --batch layernames-migrate.csv
mgmt_cli set host --batch hosts-with-groups-migrate.csv
mgmt_cli set network --batch subnets-with-groups-migrate.csv
mgmt_cli set address-range --batch ipranges-with-groups-migrate.csv
mgmt_cli add service-tcp --batch services-tcp-migrate.csv
mgmt_cli add service-udp --batch services-udp-migrate.csv
mgmt_cli add access-rule --batch all_rules-transformed.csv


Once all the CSV files have been imported, Open SmartConsole and open Policies & Layers with ‘Ctrl+o’
Click on the Layers tab, and you will see on the right pane the two new layers that have been imported (test1 and appcollection1)

Right-click on each layer and open it in a new tab.

Now, you can use this layer or just copy multiple rules from one layer to a different policy or different layer.

Limitations:
Feel free to edit the script and adjust this list per your needs.
1. On Azure Policy, The Destination Type: ‘Service Tag’ in the Network Rule Collection will not be translated; in this case, the destination in the Check Point policy will be ‘none’
- On Azure Policy, Destination Type: ‘FQDN Tag’ and ‘Web Categories’ in the Application Rule Collection will not be translated; in this case, the destination in the Check Point policy will be ‘none.’
- On Azure Policy, DNAT Rules – Export is not supported at this stage.
To view this video, you must Accept and consent to the use of cookies.
Who rated this post
About CheckMates
Learn Check Point
Advanced Learning
YOU DESERVE THE BEST SECURITY

©1994-2026 Check Point Software Technologies Ltd. All rights reserved.
Copyright
Privacy Policy
About Us
UserCenter