- Products
Network & SASE IoT Protect Maestro Management OpenTelemetry/Skyline Remote Access VPN SASE SD-WAN Security Gateways SmartMove Smart-1 Cloud SMB Gateways (Spark) Threat PreventionCloud Cloud Network Security CloudMates General CloudGuard - WAF Talking Cloud Podcast Weekly ReportsSecurity Operations Events External Risk Management Incident Response Infinity Portal NDR Playblocks SOC XDR/XPR Threat Exposure Management
- Learn
- Local User Groups
- Partners
- More
This website uses Cookies. Click Accept to agree to our website's cookie use as described in our Privacy Policy. Click Preferences to customize your cookie settings.
- Products
- AI Security
- Developers & More
- Check Point Trivia
- CheckMates Toolbox
- General Topics
- Products Announcements
- Threat Prevention Blog
- Upcoming Events
- Americas
- EMEA
- Czech Republic and Slovakia
- Denmark
- Netherlands
- Germany
- Sweden
- United Kingdom and Ireland
- France
- Spain
- Norway
- Ukraine
- Baltics and Finland
- Greece
- Portugal
- Austria
- Kazakhstan and CIS
- Switzerland
- Romania
- Turkey
- Belarus
- Belgium & Luxembourg
- Russia
- Poland
- Georgia
- DACH - Germany, Austria and Switzerland
- Iberia
- Africa
- Adriatics Region
- Eastern Africa
- Israel
- Nordics
- Middle East and Africa
- Balkans
- Italy
- Bulgaria
- Cyprus
- APAC
The Great Exposure Reset
24 February 2026 @ 5pm CET / 11am EST
CheckMates Fest 2026
Watch Now!AI Security Masters
Hacking with AI: The Dark Side of Innovation
CheckMates Go:
CheckMates Fest
Turn on suggestions
Auto-suggest helps you quickly narrow down your search results by suggesting possible matches as you type.
Showing results for
- CheckMates
- :
- Products
- :
- Network & SASE
- :
- Management
- :
- R80+ Change Control: A Visual Guide
Options
- Subscribe to RSS Feed
- Mark Topic as New
- Mark Topic as Read
- Float this Topic for Current User
- Bookmark
- Subscribe
- Mute
- Printer Friendly Page
Turn on suggestions
Auto-suggest helps you quickly narrow down your search results by suggesting possible matches as you type.
Showing results for
Are you a member of CheckMates?
×
Sign in with your Check Point UserCenter/PartnerMap account to access more great content and get a chance to win some Apple AirPods! If you don't have an account, create one now for free!
- Mark as New
- Bookmark
- Subscribe
- Mute
- Subscribe to RSS Feed
- Permalink
- Report Inappropriate Content
R80+ Change Control: A Visual Guide
As mentioned in the article Revisions Management in R80.x, I do have an informal writeup I use when teaching CCSA R80.10 that helps summarize how R80+ Change Control and Revisions are handled for the inevitable questions that arise in class. This document is a sprucing up of those notes complete with some new screenshots.
Absolutely no way this document would have been possible without the incredible contributions of Tomer Sole and in particular these articles with content contributed by him:
How to revert a Policy or discard changes?
How do you rollback an old policy?
What follows is merely a roll-up of Tomer's content from an operational perspective, with some new screenshots I have put together. I hope you find it useful.
Preface: Install the "Change Report" SmartConsole Extension (R80.30+)
Back in R77.30, there was an SMS feature called "SmartWorkflow". One of the more useful elements of this feature was a "Change Report" which could clearly and succinctly show the object and policy differences between different sessions. Based on feedback from the CheckMates User Community, the Change Report functionality is back in R80.30+, but in the form of a SmartConsole Extension. In other words this feature is NOT available by default in R80.30 and later, and you must manually add it to your R80.30+ SMS in order to use it.
Trust me: You want to install this Change Report functionality if you have R80.30 or later (but it is not supported on a standalone SMS/gateway combination); the instructions to do so are here:
sk166435: How to view changes performed between revisions
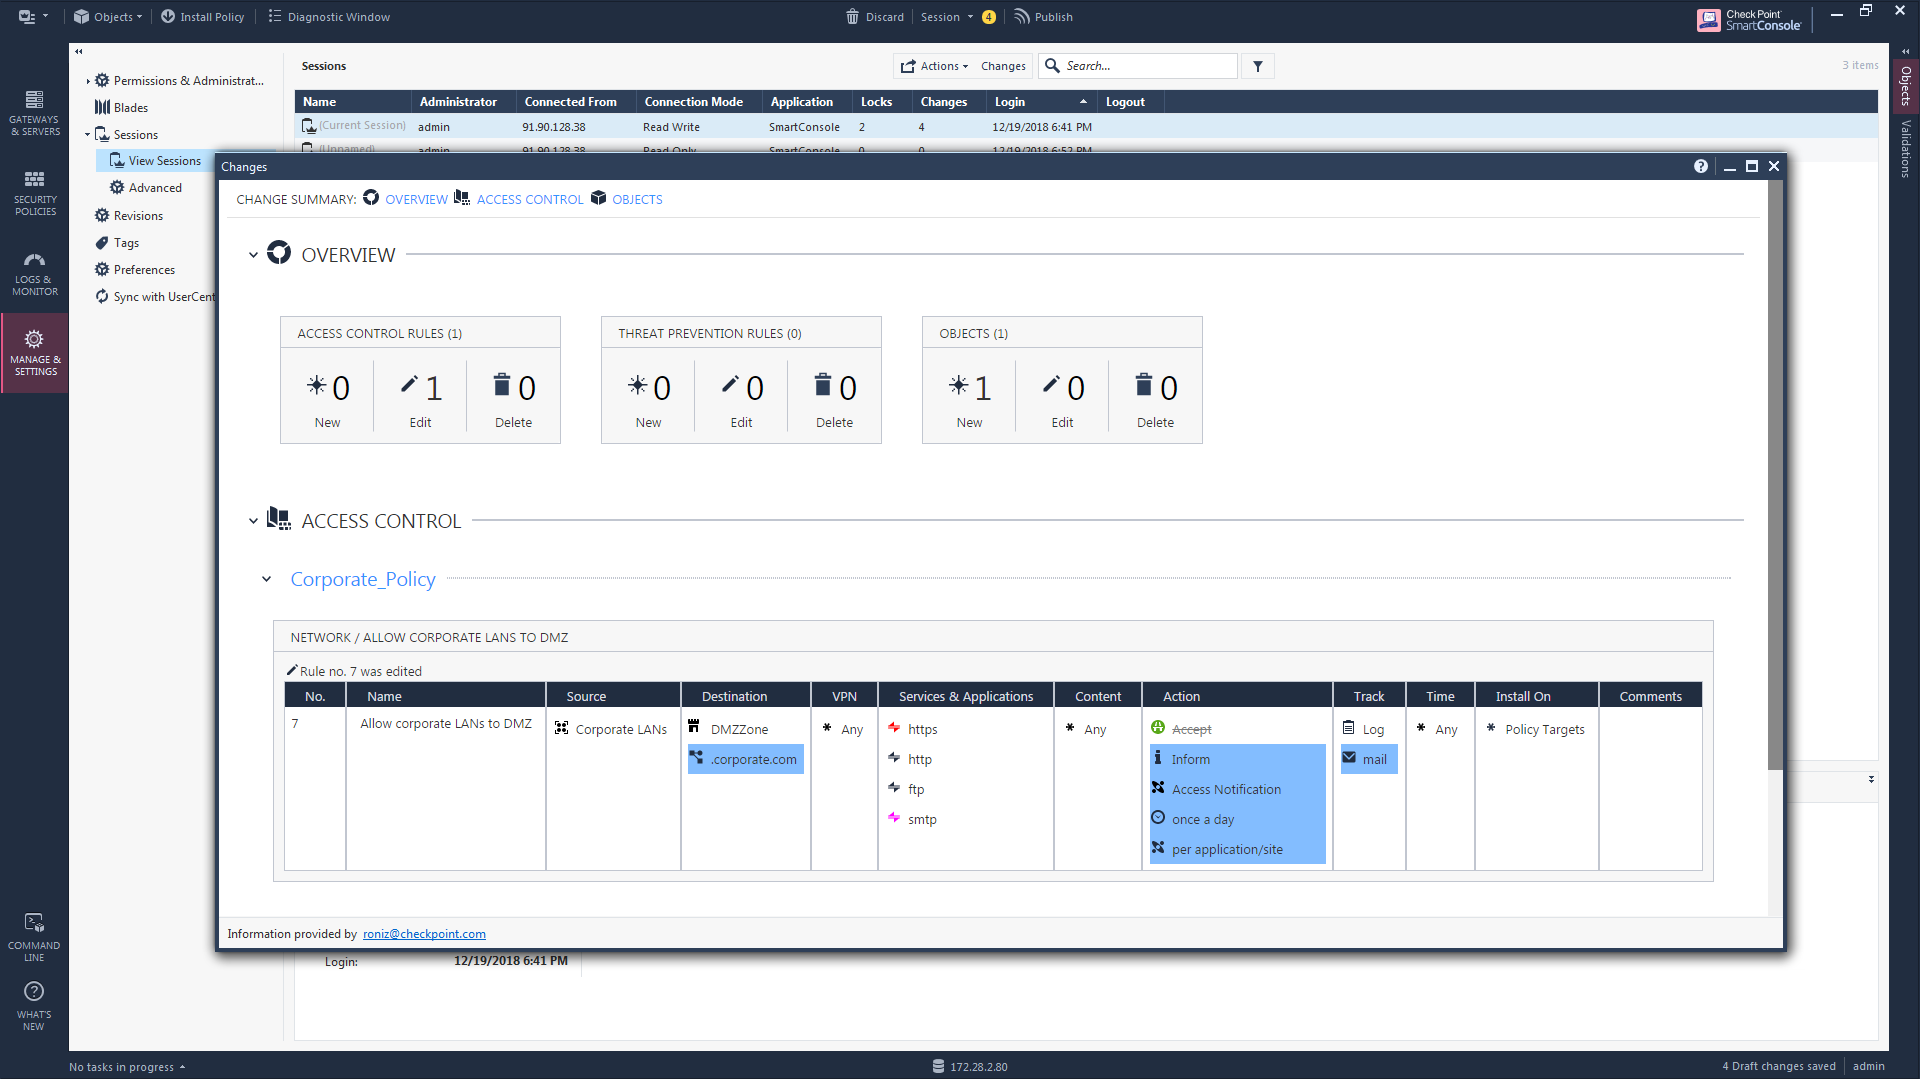
Once this extension has been successfully installed a new button called "Changes" shows up on a variety of different SmartConsole screens. Clicking it presents a popup window that looks like the following; the next three screenshots are scrolled through a single Change Report and its results:
The new "Changes" button will also appear in many more places other than the Security Policy layers screen as shown above, particularly on screens where Audit Logs can be potentially viewed. A sampling:
Note: The "Changes" button will not be shown in any of the subsequent screenshots in this article or mentioned again. It is up to YOU to keep an eye open for the "Changes" button that will appear on various screens and take advantage of it, assuming you have installed this very useful SmartConsole Extension.
Part 1: What are you about to do?
You are in the process of making changes in the SmartConsole and are unsure (or have lost track of) what you have done due to one of your coworkers constantly interrupting you. If still in an unpublished session, you can see what changes are pending by enabling the Session Pane (only available in R80.10+ management) like this:
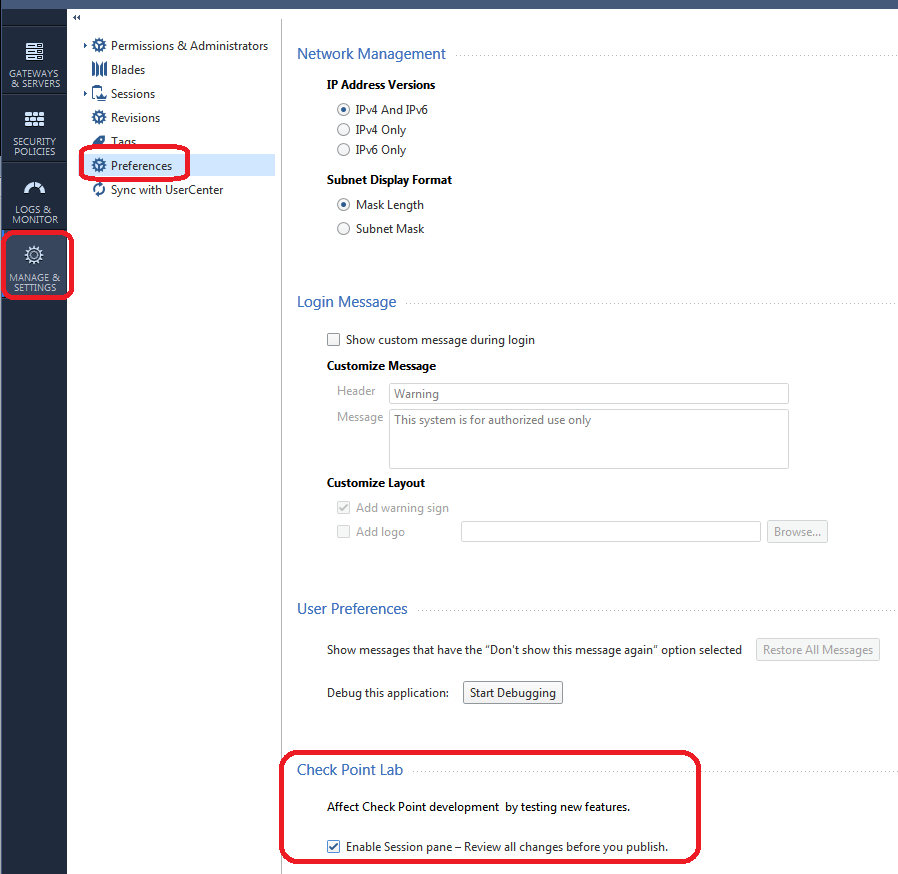
This will create a new pane on the far right of the SmartConsole where you can see pending unpublished changes:
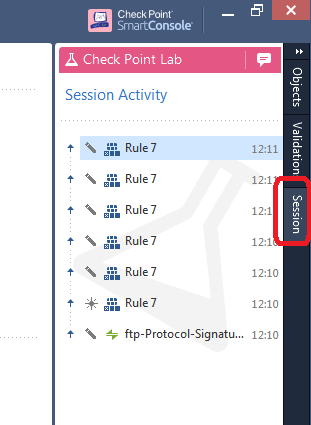
This information can be very helpful when deciding to publish or discard a session. Another way to find pending unpublished rule changes in your current session is to look for "Edited" Access Control rules, indicated by default using a purple line in the Smart Scrollbar:

Note that the colored lines in the Smart Scrollbar will also by default show rule locks currently held by other administrators (dark grey) and search results (yellow) by default. You can even make section titles (light grey) and a selected/highlighted rule (blue) show up as well:
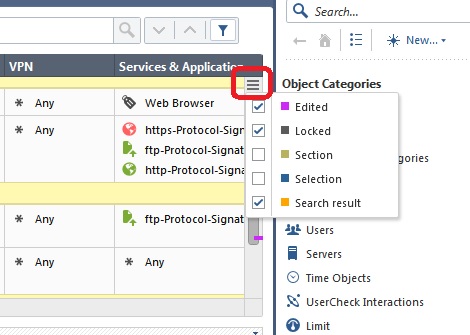
For more information about the Smart Scrollbar and some other great tips for efficiently navigating a large rulebase in the SmartConsole, see this post:
What are some of the tips and tricks for jumping between rules in the rulebase?
So you have now published your session and think you are ready to install policy to the gateway. A very good habit to get into prior to installation is looking at how many changes you are about to make:
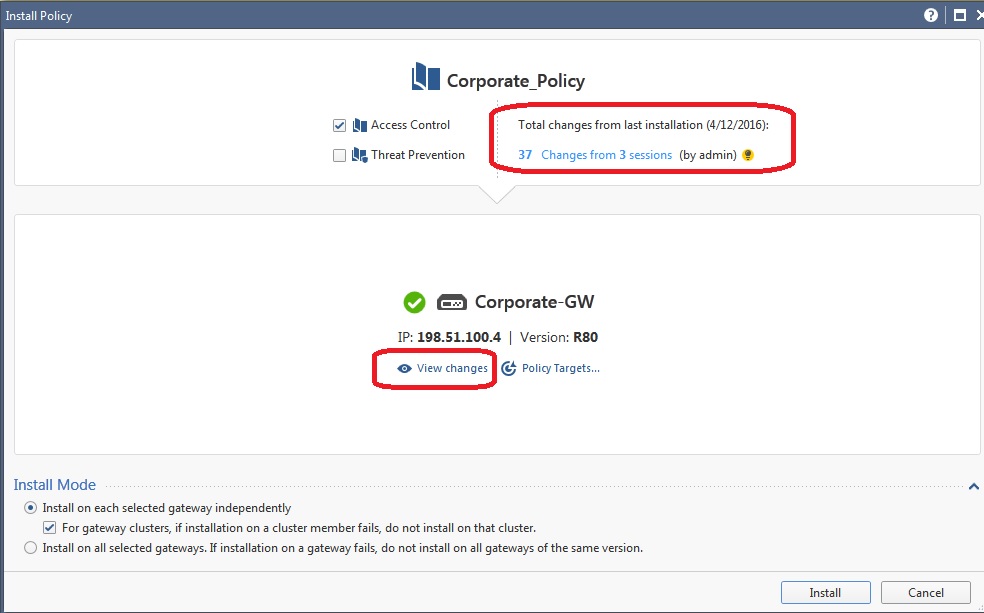
Along the top of the screen, you should ALWAYS look at how many sessions and by how many administrators will be part of what you are about to deploy on the gateway. Note that this is the total number of changes made in the SMS config since policy was last installed to this particular gateway, and not every change counted here is necessarily part of this gateway's security configuration or will impact how it operates. If you see sessions and changes that are unfamiliar or unexpected though, it is a very good idea to hit the View Changes button to see exactly what will be included:
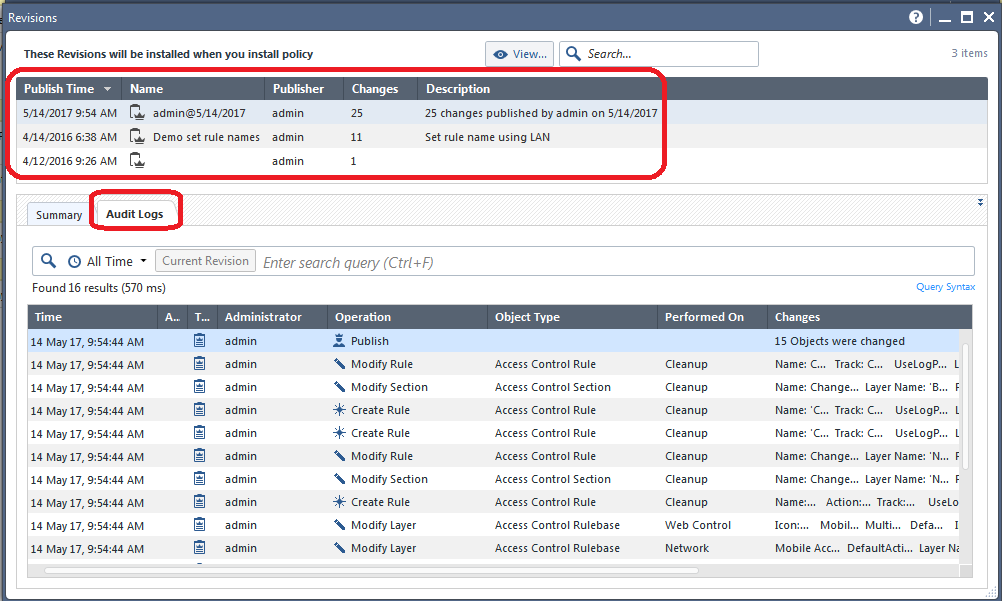
Along the top of the screen is a summary of all the different published sessions whose changes will be included if you install policy to the gateway. As shown above you can highlight one of those sessions, and then select the Audit Logs tab to see a very detailed list of exactly what changes were made in that particular highlighted session.
Let's assume that everything looks OK and you proceed to install policy to the gateway.
Part 2: The Panic Button
Your phone is ringing nonstop, people are pounding on your door, and it has all gone horribly wrong! Some very bad change got implemented when you pushed policy to the gateway at the end of the last section and it is impacting production traffic. You need to fix what you did RIGHT NOW. Thankfully the Installation History screen will be your savior in this case:
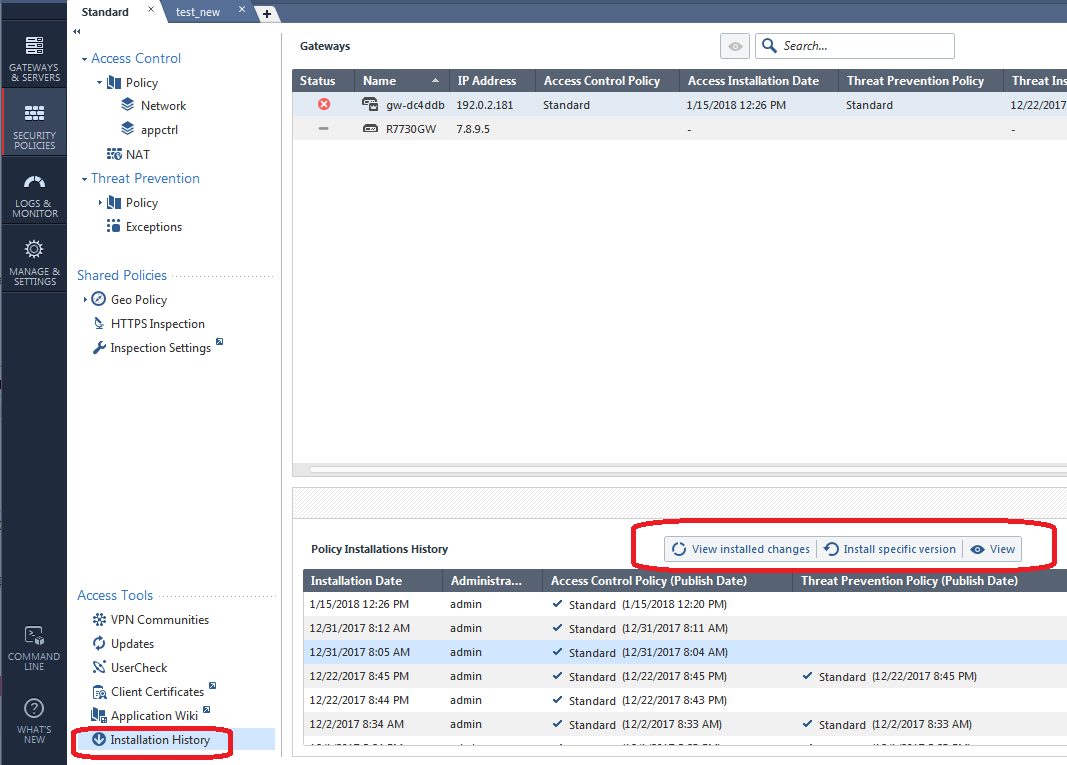
The first Installation Date shown above (1/15/2018) represents the most recent policy push (which is probably what messed everything up), just highlight one of the older installations below it, then click Install Specific Version like this:
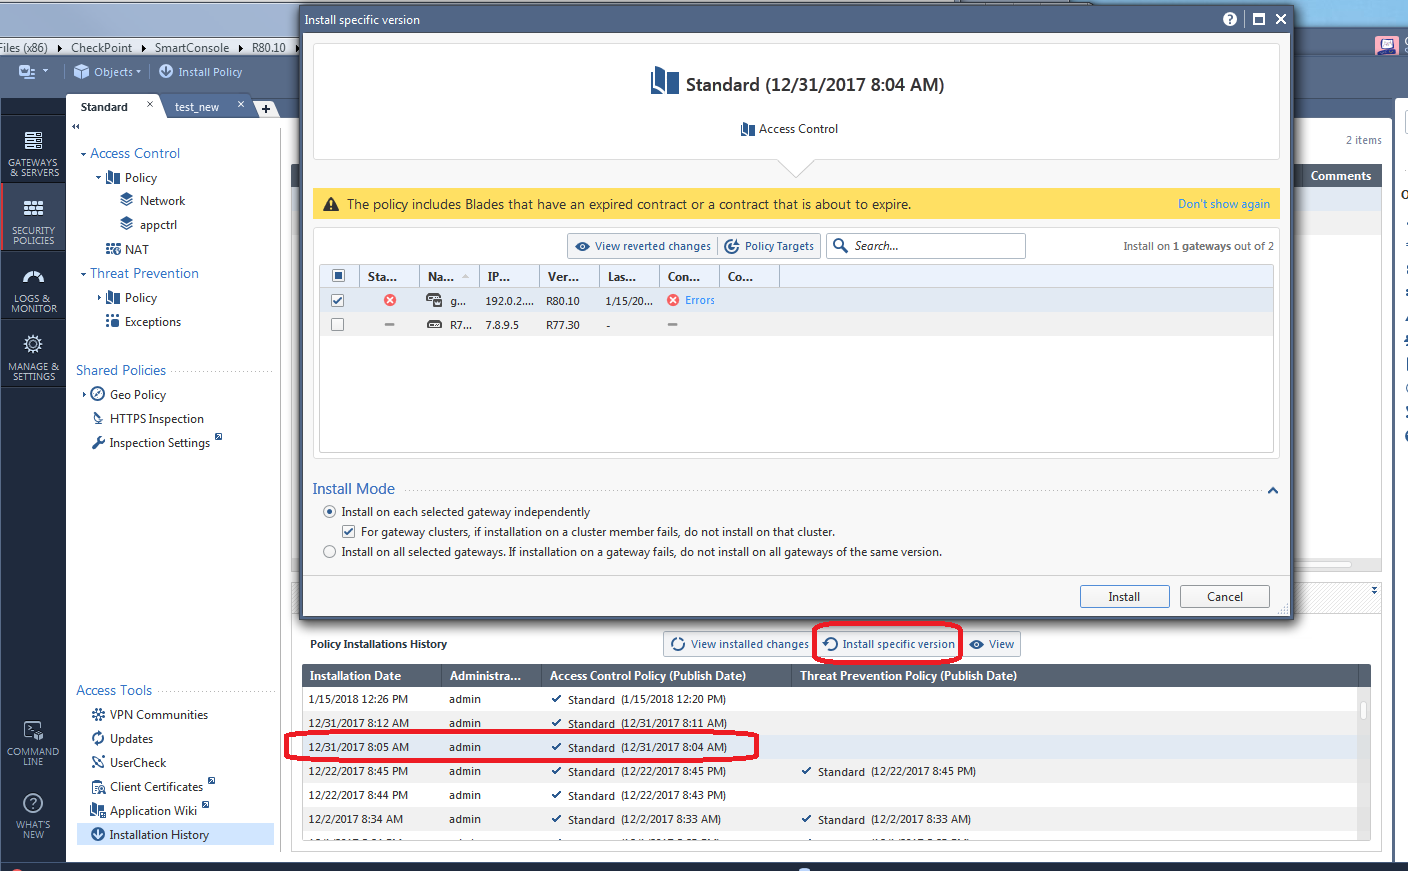
When you hit Install, a previously installed known-good copy of the firewall policy will be installed and hopefully undo whatever bad change was installed to the gateway. Note that doing this does not change any configurations shown to you in the SmartConsole, it ONLY changes what is installed on the gateway back to a good config that was previously installed. If you hit the Install Specific Version "panic button", install the older policy to the gateway, then reinstall the current security policy again, you will be right back in the "panic" situation again!
So hopefully you have been able to halt the endless door pounding and phone ringing by hitting the "panic" button as shown. You have bought yourself some time to now figure what boneheaded change was made by one of your coworkers (or you!) that caused this unfortunate situation to occur.
Part 3: The Investigation
While the Installation History screen is typically associated with "panic" reverts of gateway policies as shown in the last section, the View Installed Changes button on that same screen can be very handy for examining the specific changes in a suspect revision that came after the one you reverted to in the prior section:
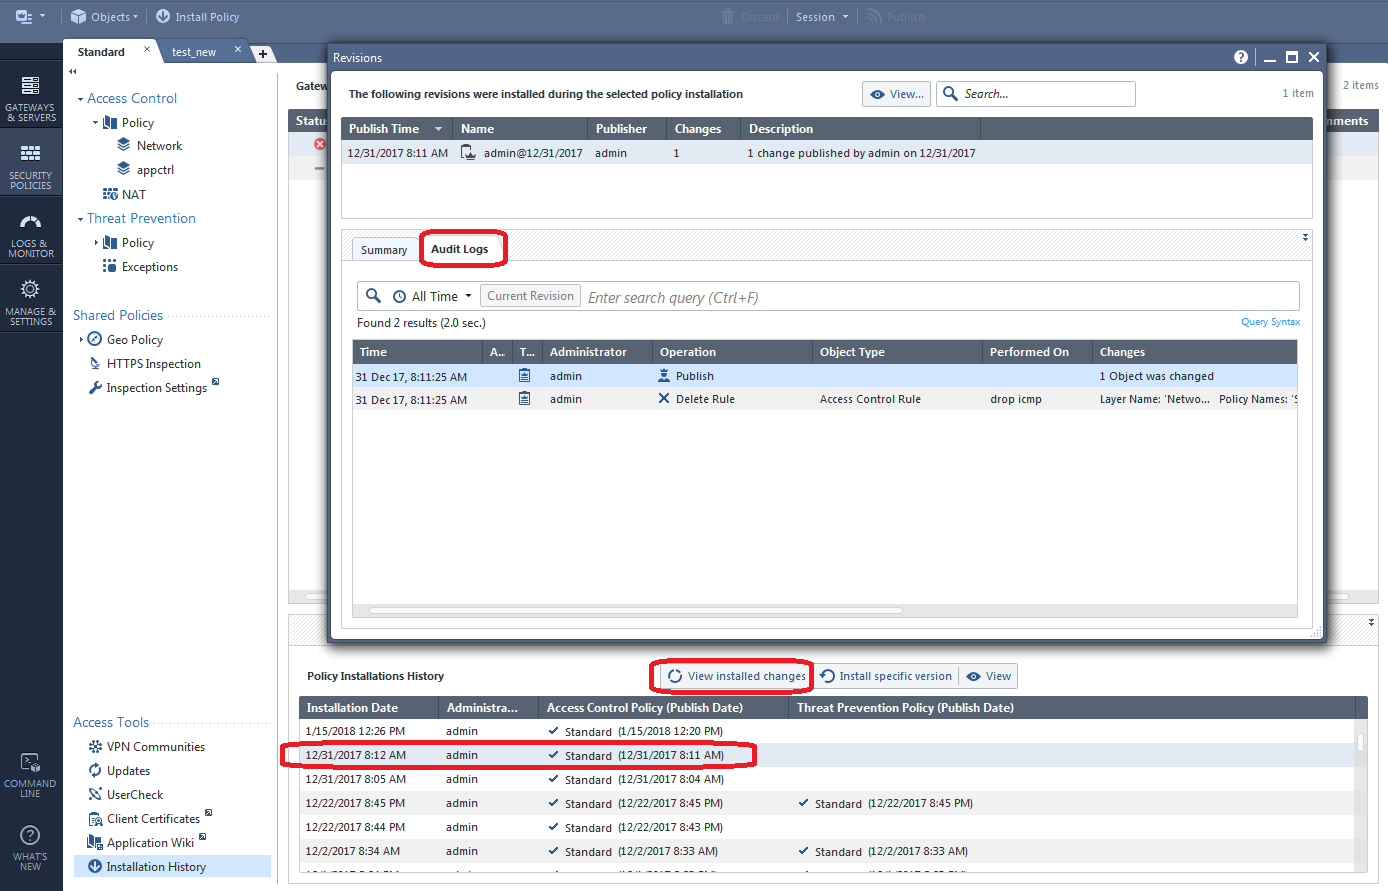
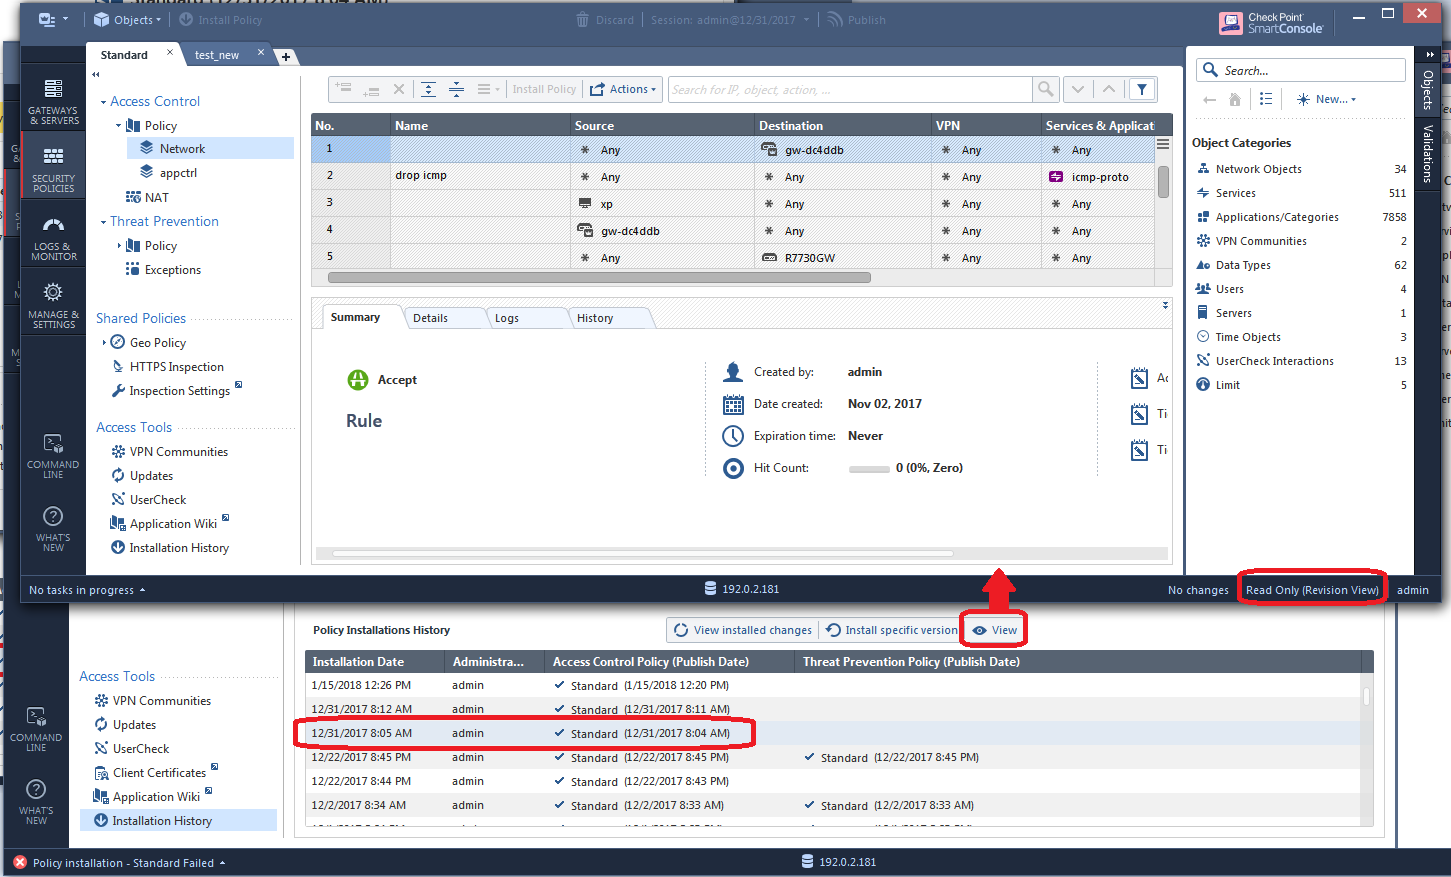
To see even more information about a certain session, hit the View button which will bring up a read-only copy of the SmartConsole showing the exact state of the configuration after that particular highlighted session was published:
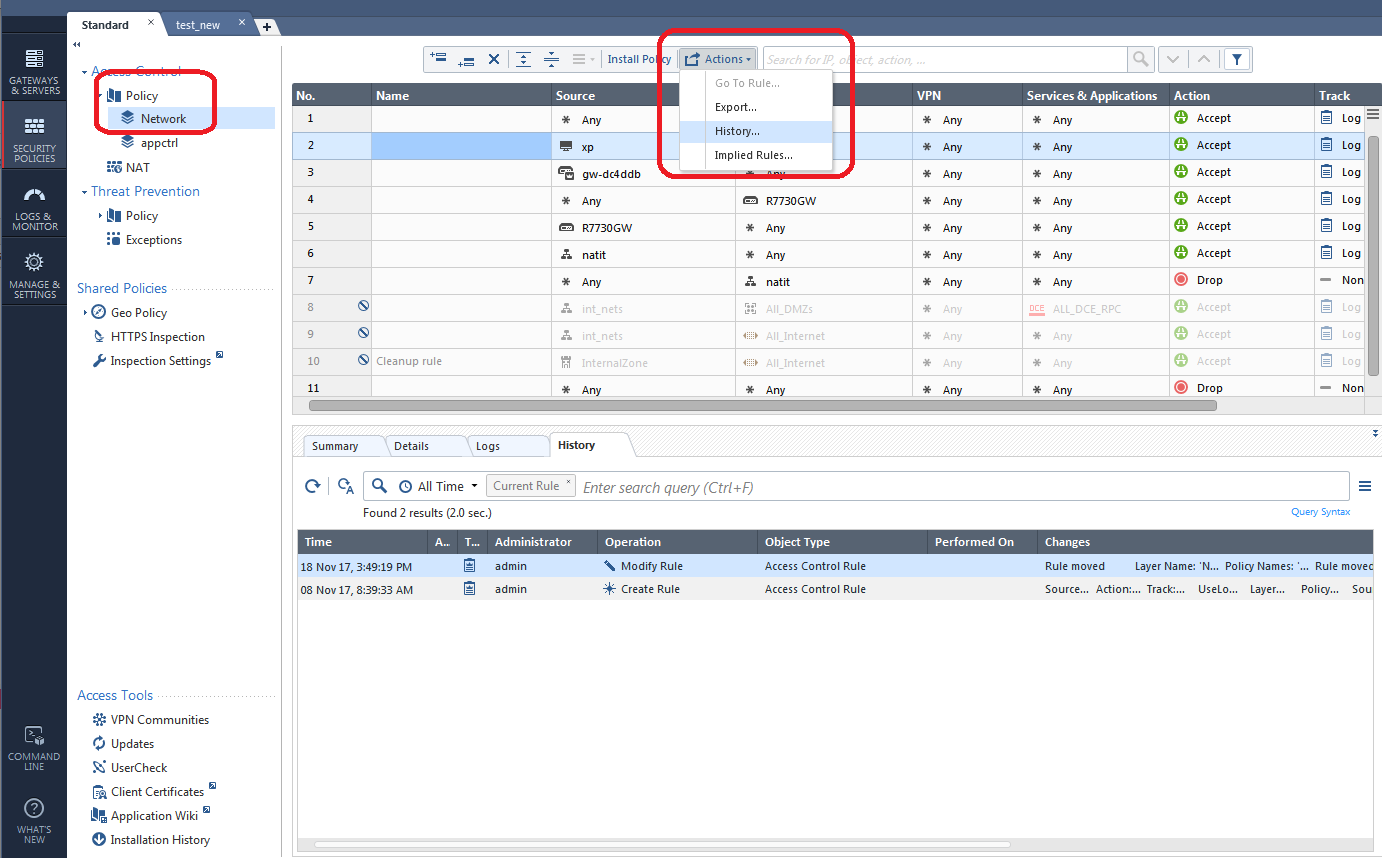
By this time you may have some suspicions that a certain policy layer and its rules may have been changed in a way that caused the "panic" situation to occur. If so select the policy layer in question, then select Actions...History:
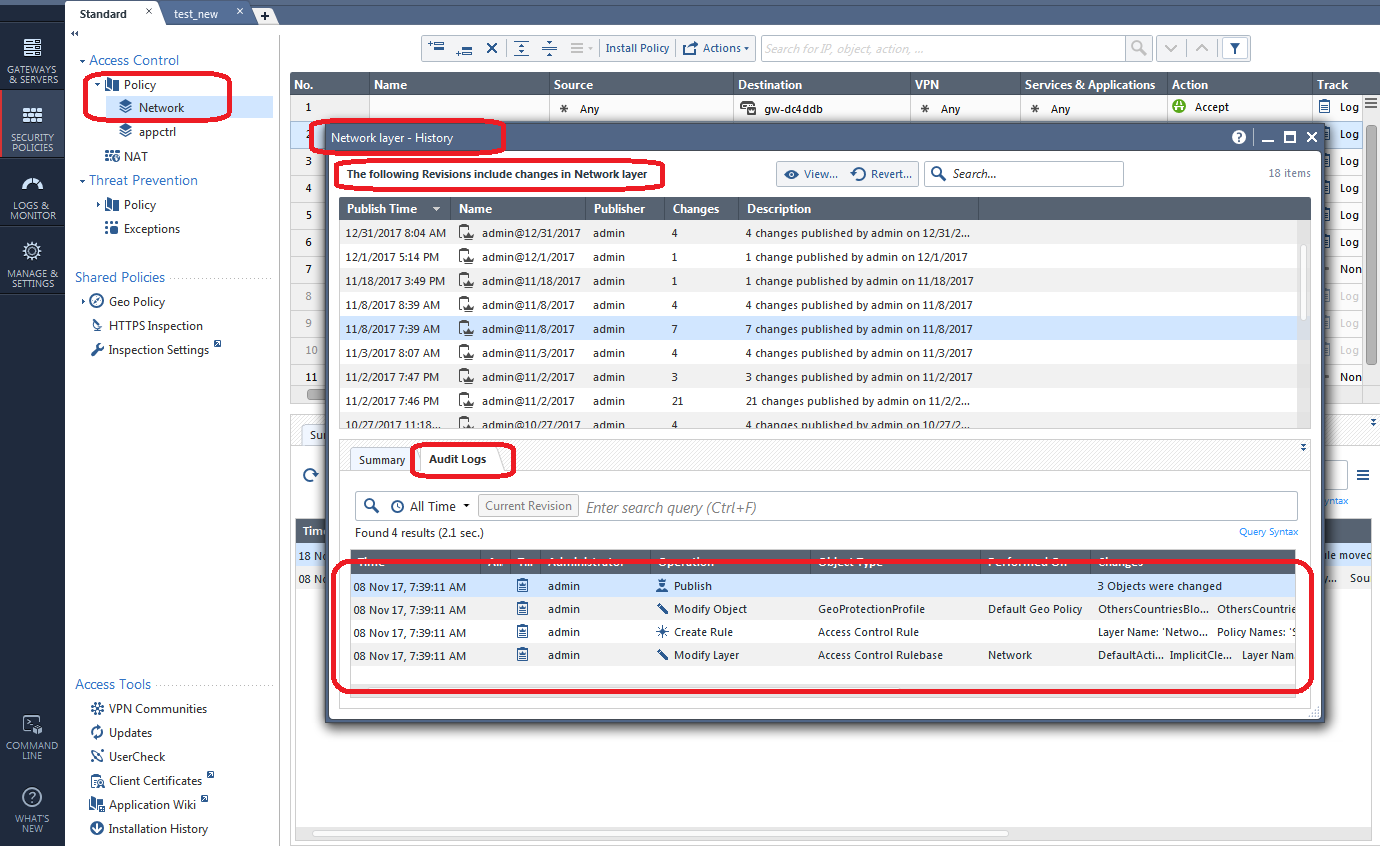
A nice concise list of all changes made in that policy layer in the various sessions is presented. If you want to see the history of only a specific rule that you suspect is the culprit, simply highlight the rule and click its History tab:
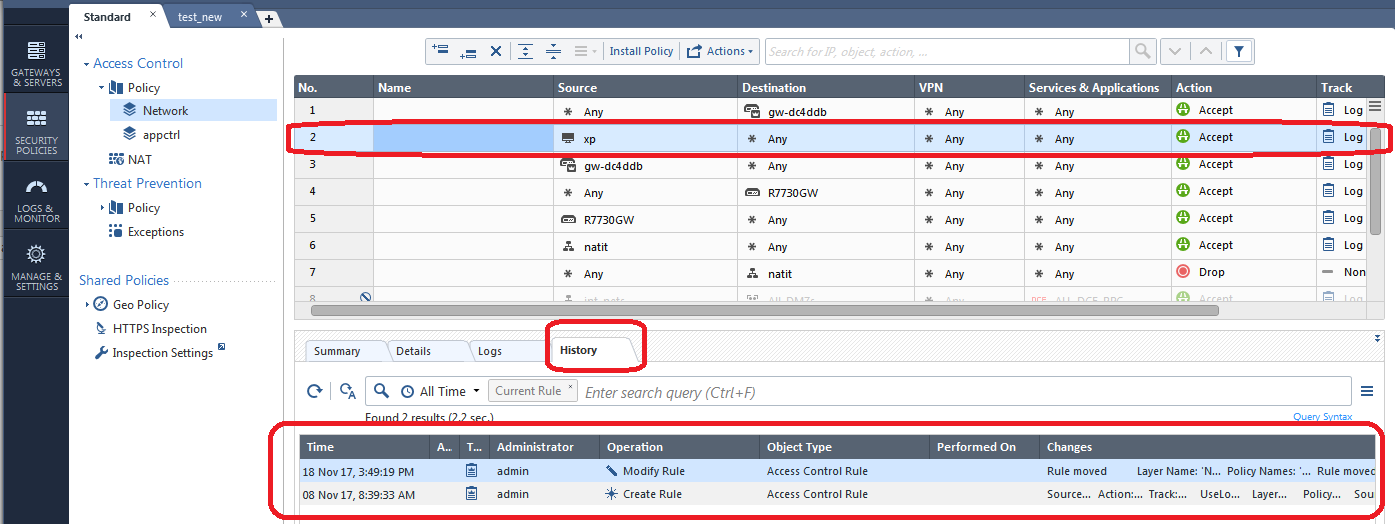
You can also view all changes on the screen below if you aren't sure exactly where to look:
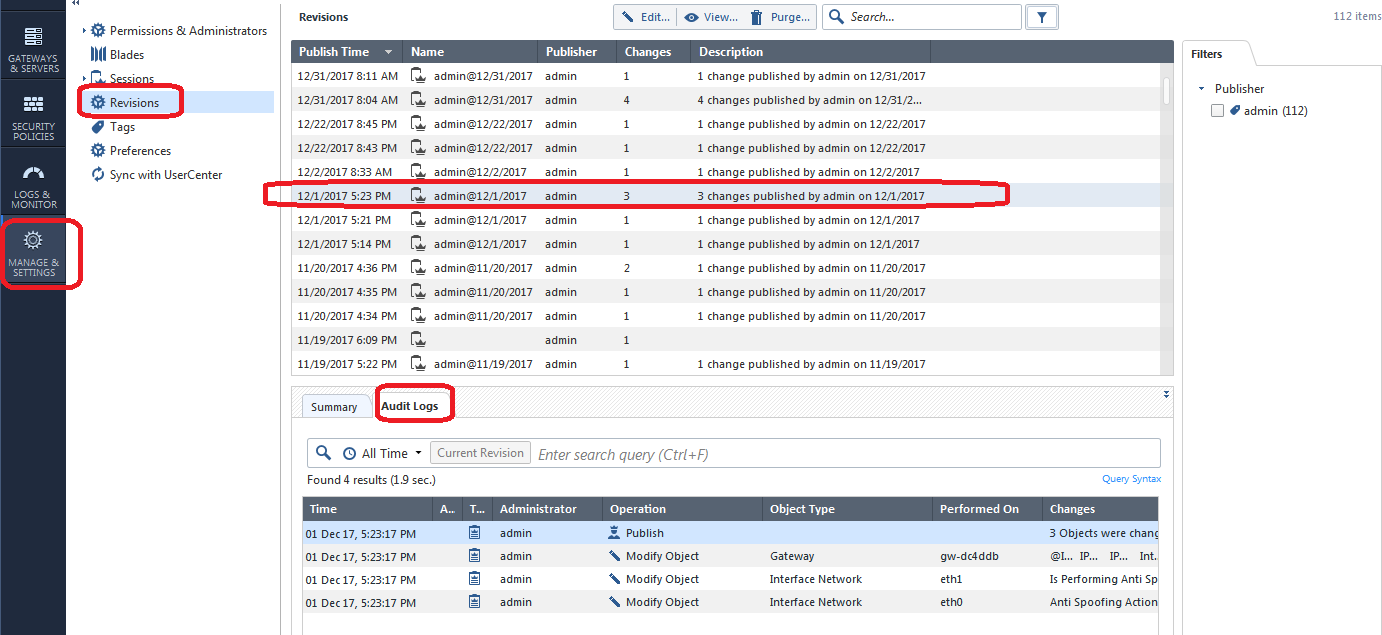
Suppose you have now identified a specific policy layer that was messed with and caused the panic situation to occur. If there were a multitude of changes made and you don't want to manually back all of them out, you can Revert the policy layer configuration back to a specific point in time, thus discarding the changes made in one or more revisions like this:
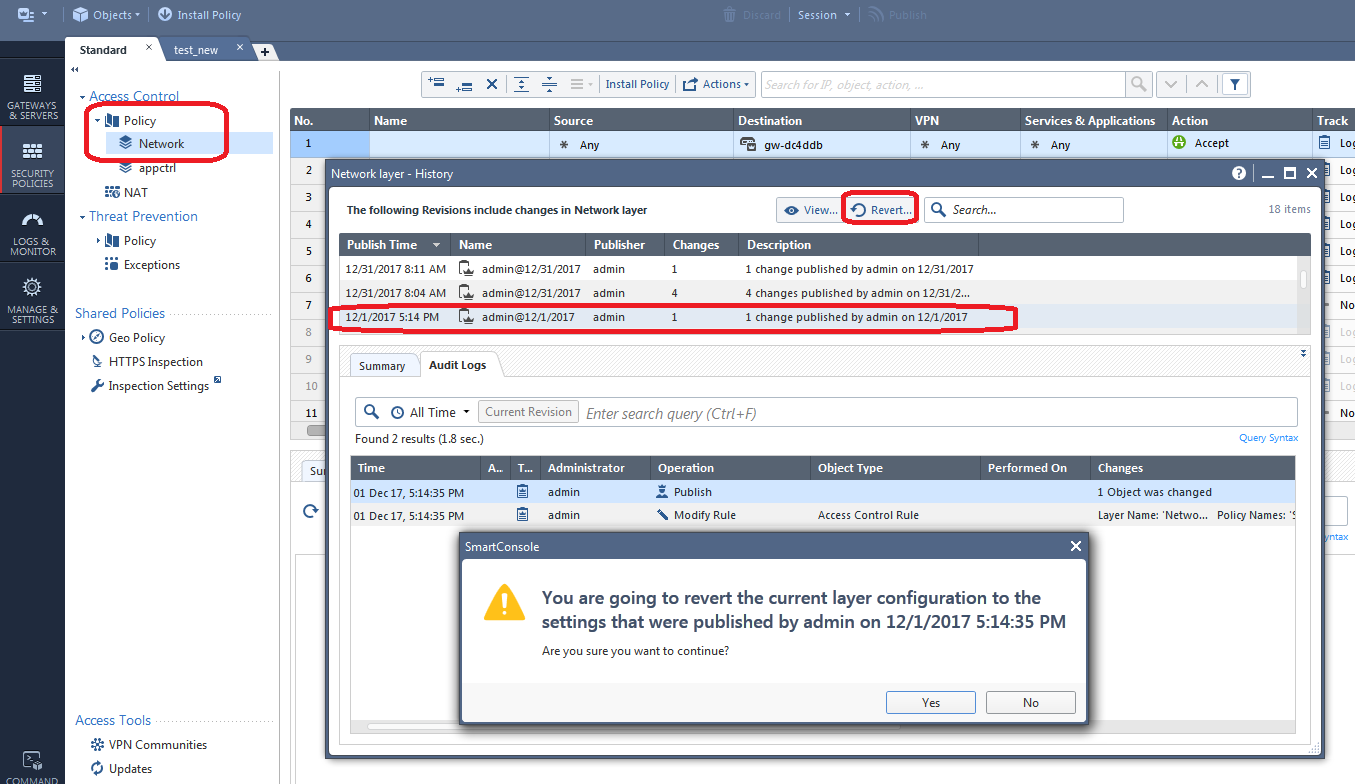
In our example above we will be removing (or undo'ing) a total of 5 changes made in the two published sessions just above the one we selected.
Part 4: Your Final Log Analysis Option
If you still can't determine what changes caused the problem, your last ditch effort is to look at the raw system-wide Audit logs like this:
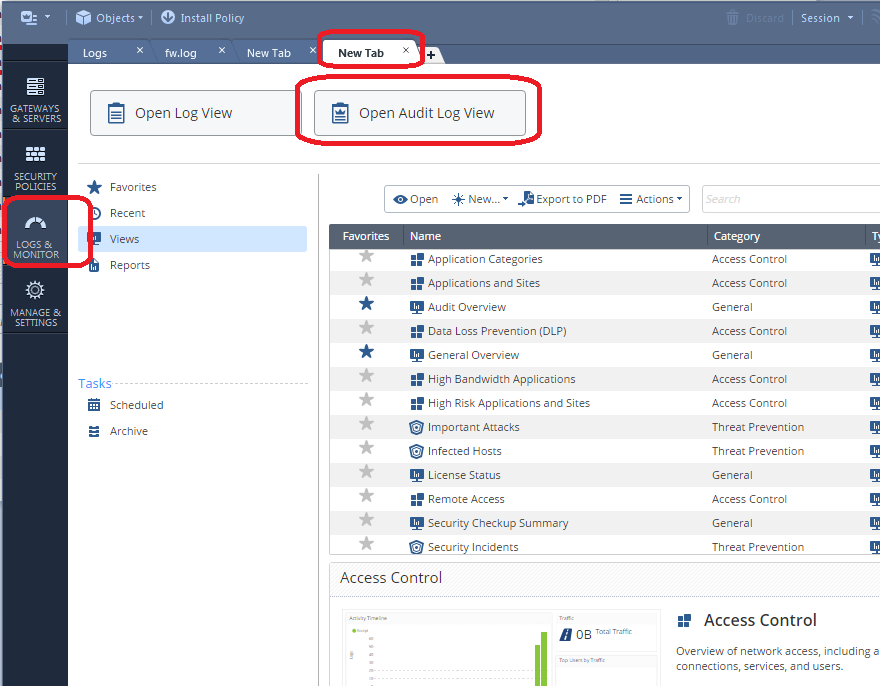
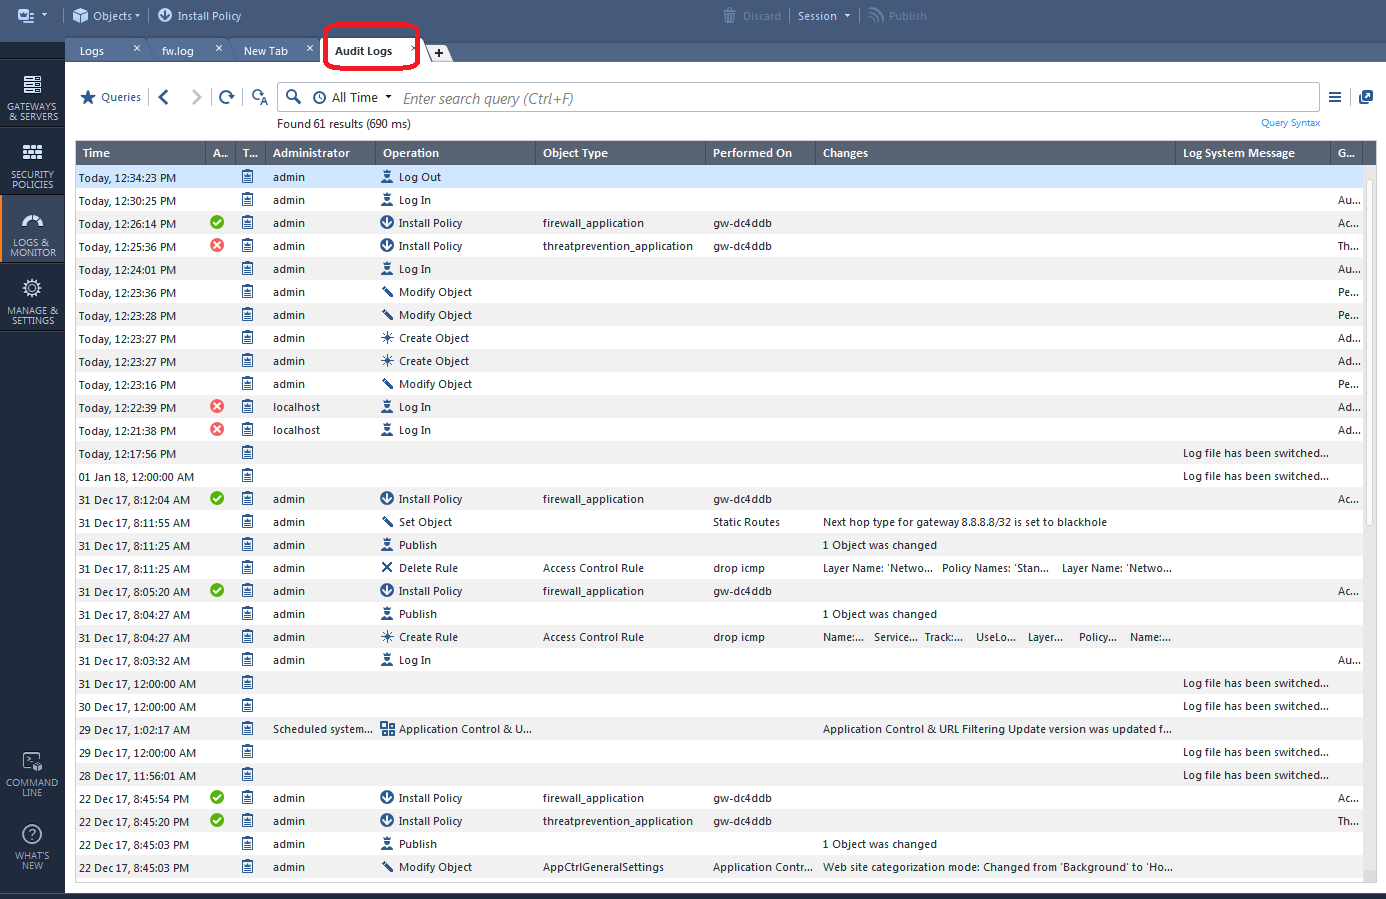
This technique was also possible in R77.30 with the Audit/Management tab of the SmartView Tracker. The SmartWorkflow product also has some nice change reports in that version.
Part 5: Your Last Resort..."Revert to this Revision" (R80.40+ Only)
PLEASE READ THIS SECTION IN ITS ENTIRETY BEFORE INVOKING THIS FEATURE.
The "Revert" option covered in Part 3 has a glaring limitation: While it can certainly revert changes made to a particular policy layer as shown, it DOES NOT revert any changes to object properties that also might have been made in association with those policy layer changes, nor does it revert any other properties changes of any type either including Global Properties, Policy Layer properties or Threat Prevention properties, to name a few. Therefore once you have reverted the policy layer as shown part 3, if the underlying problem is that the properties of some kind of object were tampered with, the Revert operation will not change the object properties back and the problem will still be present.
Enter the new "Revert to this Revision" feature introduced in R80.40, added by Check Point in response to various concerns expressed by the CheckMates User Community. Note that all this feature requires for use is a R80.40+ SMS or MDS, it DOES NOT require R80.40 on the security gateways themselves for use. On an R77.30 and earlier SMS it was possible to "Restore a Database Revision" and essentially revert all elements of the Check Point configuration (objects, policies, settings) back to a known good point in time. Any changes made since the restored revision was originally taken were GONE.
That is exactly what the "Revert to this Revision" feature does in R80.40+. You can essentially choose a published session that had known-good changes in it, and revert to it, which will completely remove all changes since that selected revision was published which includes all object, policy, and properties changes. All changes made after the reverted session are GONE, just like they were after restoring a revision in R77.30. Note that all the changes in the selected published revision are preserved after the "Revert to this Revision", so normally you'll want to select that known-good revision when invoking this operation.
A few cautions before use:
1) Once completed, a "Revert to this Revision" is permanent and cannot be undone. If considering use of the "Revert to this Revision" feature, it is strongly recommended to take a backup of the SMS and verify the backup is good before proceeding. This can be easily accomplished from the Gaia web interface of the SMS, and the resulting backup file can be downloaded directly to your desktop for safekeeping. All SmartConsole administrators will need to exit the SmartConsole to ensure the backup is successfully run. Once downloaded, make sure the backup *tgz file can be successfully opened by tools such as 7-Zip before proceeding.
2) This feature should only be used as a last resort; if you have skipped to this section without reading all of this document I'd strongly recommend you STOP and read this whole document in its entirety first. It is highly likely that the techniques documented earlier will be able to meet your needs without having to resort to the "big gun" of "Revert to this Revision".
OK so let's suppose that we have made 11 changes in a session that are causing major problems once installed to a gateway; you can see them summarized on the Revisions screen which we have seen earlier:
But what were all those 11 changes exactly? Let's take a look:
Se we can see a smattering of object, policy, and global properties changes representing every part of our configuration. These "bad" changes comprise the 11 changes shown in the first screenshot. Now we want to essentially undo everything (and we mean EVERYTHING) in that session. So we choose the next-oldest known-good published session (17 changes in our example) and pick "Revert to this Revision" like this (note that you must be using R80.40+ on your SMS to see this option):
Screen 1 of the Revert operation appears. READ IT ALL BEFORE PROCEEDING by clicking Next:
Screen 2, which performs a verification of your current configuration's eligibility to be reverted, if this fails DO NOT PROCEED and contact TAC for assistance if you still need to Revert.
Screen 3, final confirmation:
Screen 4, Revert operation complete, you will next be prompted to restart the SmartConsole:
After logging back into the SmartConsole, we can see that all changes made in that 11-change published session are gone:
And that concludes our use of the "Revert to this Revision" feature, introduced in R80.40 but should only be used as a LAST RESORT.
Hopefully you found this writeup useful, please let me know if you have any other change control techniques that were missed and I'll be happy to add them. Thanks again to Tomer Sole!
Gaia 4.18 (R82) Immersion Tips, Tricks, & Best Practices Video Course
Now Available at https://shadowpeak.com/gaia4-18-immersion-course
Now Available at https://shadowpeak.com/gaia4-18-immersion-course
35 Replies
- Mark as New
- Bookmark
- Subscribe
- Mute
- Subscribe to RSS Feed
- Permalink
- Report Inappropriate Content
Thanks Tim! I would be very interested to hear about VSX and revision control. Is it really all "under control" now with R80.x when you have VSes stretching across multiple CMAs? All routing and spoofing updates and object changes considered? Ability to roll back to revisions as far as 2000+?
- Mark as New
- Bookmark
- Subscribe
- Mute
- Subscribe to RSS Feed
- Permalink
- Report Inappropriate Content
VSX is not really in my area of expertise, Tomer Sole should be able to weigh in though.
--
Second Edition of my "Max Power" Firewall Book
Now Available at http://www.maxpowerfirewalls.com
Gaia 4.18 (R82) Immersion Tips, Tricks, & Best Practices Video Course
Now Available at https://shadowpeak.com/gaia4-18-immersion-course
Now Available at https://shadowpeak.com/gaia4-18-immersion-course
- Mark as New
- Bookmark
- Subscribe
- Mute
- Subscribe to RSS Feed
- Permalink
- Report Inappropriate Content
I'm very interested as well about the status of MDSM with VSX regarding R80.x revision control.
This is where it is really important to function properly.
- Mark as New
- Bookmark
- Subscribe
- Mute
- Subscribe to RSS Feed
- Permalink
- Report Inappropriate Content
I'm really concerned as our MDS had 3000 odd revisions available over 9 months period - would it really work on VSX to roll back to version 1 (the earliest) considering that there has been number of interface and routing changes on top of regular rules. If not, what's the point having 3000 revisions and making code more complex and chewing resources that could be utilised for better purpose? I really think that one should be able to turn it off completely. There are other tools available to achieve the same result (i.e. Tufin)
Since management is becoming noticeably resource hungry all these little things start to add up and decrease user experience - soon we will need management server performance optimisation book Tim - I only take 10% for the idea ![]()
- Mark as New
- Bookmark
- Subscribe
- Mute
- Subscribe to RSS Feed
- Permalink
- Report Inappropriate Content
Thanks Tim,
This is really nice & Informative document.
I just want to know that when we click on History option, How many entry it will show. Means what is the limit of that we can get back to earlier config.
- Mark as New
- Bookmark
- Subscribe
- Mute
- Subscribe to RSS Feed
- Permalink
- Report Inappropriate Content
we had 1500+ revisions available on a busy CMA. That's since the first upgrade to R80 back in March 2017. If you discard VSX concerns then I guess you should be able to go back all the way. Theoretically ![]()
- Mark as New
- Bookmark
- Subscribe
- Mute
- Subscribe to RSS Feed
- Permalink
- Report Inappropriate Content
Hi everyone,
Does the "panic button" as described by Tim (install a previous revision on the gateway) satisfy the case that you described - overcoming VSX misconfiguration?
Also I would like to thank Tim Hall for centralizing all these features in one visual guide ![]()
- Mark as New
- Bookmark
- Subscribe
- Mute
- Subscribe to RSS Feed
- Permalink
- Report Inappropriate Content
Hi Guarav,
It will show history back to when the SMS was first loaded/upgraded, unless you have purged prior sessions from the Manage & Settings...Revisions screen. Note that purging revisions doesn't appear to actually free up any disk space on the SMS as shown by the df command, but presumably makes more storage space within the configuration database available. Also just to be clear doing a purge does not roll back or undo changes in the purged sessions.
--
Second Edition of my "Max Power" Firewall Book
Now Available at http://www.maxpowerfirewalls.com
Gaia 4.18 (R82) Immersion Tips, Tricks, & Best Practices Video Course
Now Available at https://shadowpeak.com/gaia4-18-immersion-course
Now Available at https://shadowpeak.com/gaia4-18-immersion-course
- Mark as New
- Bookmark
- Subscribe
- Mute
- Subscribe to RSS Feed
- Permalink
- Report Inappropriate Content
Ok Great.
If this is the case then at some point of time we need to free up the space. I which directory it stores History/ Revision database.
- Mark as New
- Bookmark
- Subscribe
- Mute
- Subscribe to RSS Feed
- Permalink
- Report Inappropriate Content
Hi Gaurav, revisions are not stored in "directories" anymore. The new R80 backend uses native lightweight revisions based on the diff. Purge is available from the GUI. See How can I control the size of my R80.10 Security Management Server?
- Mark as New
- Bookmark
- Subscribe
- Mute
- Subscribe to RSS Feed
- Permalink
- Report Inappropriate Content
They are stored now everywhere and nowhere ![]() Revisions Management in R80.x
Revisions Management in R80.x
Revisions are now built-in in the database, describing different baselines of the database state.
Please take a look at other threads here:
How can I control the size of my R80.10 Security Management Server?
The revisions themselves are very light and only contain the delta diff (this is unlike pre-R80 Management servers where a revision was a zipped copy of the entire configuration). Either way, you can always open the Revisions view and purge older revisions.
In order to avoid an ever-growing database size, R80.10 Jumbo Hotfix take 42 and above introduces automatic IPS purge which deletes revisions older than 30 days. In R80.10 Jumbo Hotfix take 42 and above this purge happens automatically every 7 days.
- Mark as New
- Bookmark
- Subscribe
- Mute
- Subscribe to RSS Feed
- Permalink
- Report Inappropriate Content
Bravo, Tim!
- Mark as New
- Bookmark
- Subscribe
- Mute
- Subscribe to RSS Feed
- Permalink
- Report Inappropriate Content
Hi Dirk! Not really applicable to this topic about revisions ![]() but I would use API script (or dbedit but that will be much slower) - we recently were faced with a similar issue so I just wrote an API script that created a group containing all IPs/subnets on the list. Depending on your environment (R80? SmartCentre Server or MDS/which CMAs, format of the list) could provide more advise.
but I would use API script (or dbedit but that will be much slower) - we recently were faced with a similar issue so I just wrote an API script that created a group containing all IPs/subnets on the list. Depending on your environment (R80? SmartCentre Server or MDS/which CMAs, format of the list) could provide more advise.
Don't know but maybe https://community.checkpoint.com/people/dwelccfe6e688-522c-305c-adaa-194bd7a7becc can move this question to a new thread?
- Mark as New
- Bookmark
- Subscribe
- Mute
- Subscribe to RSS Feed
- Permalink
- Report Inappropriate Content
Had a student point out that the Smart Scrollbar in the R80+ SmartConsole can also be used to locate pending unpublished changes, I added some text and screenshots documenting this technique.
--
Second Edition of my "Max Power" Firewall Book
Now Available at http://www.maxpowerfirewalls.com
Gaia 4.18 (R82) Immersion Tips, Tricks, & Best Practices Video Course
Now Available at https://shadowpeak.com/gaia4-18-immersion-course
Now Available at https://shadowpeak.com/gaia4-18-immersion-course
- Mark as New
- Bookmark
- Subscribe
- Mute
- Subscribe to RSS Feed
- Permalink
- Report Inappropriate Content
Yeah this is kind of a hidden feature, we really should publish this more What are some of the tips and tricks for jumping between rules in the rulebase?
- Mark as New
- Bookmark
- Subscribe
- Mute
- Subscribe to RSS Feed
- Permalink
- Report Inappropriate Content
Haha didn't know it was "hidden" - had to check my presentation i did to my troops back in March 2017.. it was already there! ![]()
- Mark as New
- Bookmark
- Subscribe
- Mute
- Subscribe to RSS Feed
- Permalink
- Report Inappropriate Content
Come and check out our alpha version of 'Change Report' supported by SmartConsole Extensions in CPX 2019
- Mark as New
- Bookmark
- Subscribe
- Mute
- Subscribe to RSS Feed
- Permalink
- Report Inappropriate Content
Hi all :
is there a way( like SmartDashboard) to revert all object changes in one step ??? similar to revert an old database revision. ?
if so, I'll thanks to all for your help .
- Mark as New
- Bookmark
- Subscribe
- Mute
- Subscribe to RSS Feed
- Permalink
- Report Inappropriate Content
You can revert what was installed on a gateway in one step (the compiled policy) — Step 2 of the root post in this thread.
Reverting the whole database in one step like a R77.30 Database Revision? Not currently possible.
- Mark as New
- Bookmark
- Subscribe
- Mute
- Subscribe to RSS Feed
- Permalink
- Report Inappropriate Content
Great post, thanks Tim!
As I seem not to be the only one I would like to reask the question about revisions and VSX in MDM environments.
I know about the complexity and the fact that it was not supported with R77.30's way of revisons.
As I can not find clear answers about the vsx question please do not beat me for asking this question again:
Is vsx in mdm environments supported for revisons or should I better avoid using revisions in vsx environments like I did the last year since introduction with R77.something?
Thanks in advance!
Regards
Sven
- Mark as New
- Bookmark
- Subscribe
- Mute
- Subscribe to RSS Feed
- Permalink
- Report Inappropriate Content
Sven,
I think the problem is a little bit deeper.
Question for R80.xx„Is revision control supported with VSX/MDM or not?“
In my view, YES, but it is useless.
Let me explain.
With revision control you are not able to save or restore any objects, only rules are saved.
If you delete an object, did publish and restore an older revision you didn’t get back the deleted object. A rule contained that deleted object is shown with a „Non-existin object“.
Same thing happens with VSX objects. You can change them but these changes are not reflected in the revisions. That‘s why I think it is possible to use revision with VSX.
But you can‘t revert any changes on these VSX objects because they are not saved in the revisions.
With database revisons under R77.xx you had a chance to use these database revision. If you synchronize your database revision with an backup of your VSX-gateways and reverting both at the same time, everything will be fine.
The problem with that is how VSX works. If you change a VSX-object, these changes are made in the SMS database and too pushed some configuration to the VSX-gateways. These settings have to be the same on SMS and VSX-gateways.
We used this for complete crash recovery only. Everytime we changed a VSX object we create a database revsision and did a backup of the VSX gateway. For revert we installed both, the created database revision and the gateway backup.
If there are no changes in VSX-objects beetween the database revisions you can use them for revert.
With R80.xx you don’t have a complete database revision, it‘s only for rules (maybe and hoping in later releases).And VSX configuration happens the same way as in R77.xx, changes in SMS and on gateway. If you want to restore an older backup of your SMS with VSX gateways you need to restore too a backup from the same time of your gateways.
I know these restore is worst and for larger environments with more then one VSX gateways it‘s not feasable. And at least you really have to know what you are doing.
Maybe someone of the MDM/VSX experts can jump in to discuss.
Wolfgang
- Mark as New
- Bookmark
- Subscribe
- Mute
- Subscribe to RSS Feed
- Permalink
- Report Inappropriate Content
Hi Wolfgang,
thanks for your detailed explanation. 👍
Let's wait what the VSX/MDM-experts can add to this discussion.
Cheers
Sven
- Mark as New
- Bookmark
- Subscribe
- Mute
- Subscribe to RSS Feed
- Permalink
- Report Inappropriate Content
Hi all,
we are still interested in the feedback of the VSX/MDM-experts 🤗
Is there someone in this threat who can join our VSX/MDM-discussion?
Thanks in advance.
Cheers
Sven
- Mark as New
- Bookmark
- Subscribe
- Mute
- Subscribe to RSS Feed
- Permalink
- Report Inappropriate Content
Thanks. very informative.
- Mark as New
- Bookmark
- Subscribe
- Mute
- Subscribe to RSS Feed
- Permalink
- Report Inappropriate Content
Hello Tim,
Thanks for this guide. very helpful.
I got a question, Let's imagine R80.20+ .
Tim and Dameon are admin and create object rules everyday.
One day, Dameon did 40 unpublished changes did not save it and is sick.
Tim saw it on the Manage > Session > View Session. but Tim doesn't really know what Daemon did.
Checkpoint labs is only for our own sessions.
Option 1 : Publish changes from Dameon, review and revision discard if needed?
Nether disconnected or in use and not saved, we can review PUBLISH informations, but not the UNPUBLISH.
I may have miss something on your guide 🙂
Regards,
Anthony
- Mark as New
- Bookmark
- Subscribe
- Mute
- Subscribe to RSS Feed
- Permalink
- Report Inappropriate Content
I tried this in my lab, if Dameon has an unpublished session pending, as another administrator you can view the number of changes/locks it has on the Manage & Settings...Sessions...View Sessions screen. So that would give you some idea of how "big" his unpublished session is, and you could publish or discard it based on what you see.
However there does not seem to be a direct way to see exactly what changes are pending in that unpublished session, unless you right-click it and execute a "Take Over". You will then take over Dameon's session in your SmartConsole, can now view the pending changes in the Session Activity tab and Smart Scrollbar, and can decide to publish or discard it.
Gaia 4.18 (R82) Immersion Tips, Tricks, & Best Practices Video Course
Now Available at https://shadowpeak.com/gaia4-18-immersion-course
Now Available at https://shadowpeak.com/gaia4-18-immersion-course
- Mark as New
- Bookmark
- Subscribe
- Mute
- Subscribe to RSS Feed
- Permalink
- Report Inappropriate Content
Added coverage and screenshots for the very handy "Revert to this Revision" feature added in R80.40. This feature was a direct result of feedback from the CheckMates User Community, well done everyone! The capability to revert absolutely EVERYTHING back to an earlier point in time similarly to restoring a revision in R77.30 (not just Reverting policy layer changes in R80+) is back in R80.40!
Gaia 4.18 (R82) Immersion Tips, Tricks, & Best Practices Video Course
Now Available at https://shadowpeak.com/gaia4-18-immersion-course
Now Available at https://shadowpeak.com/gaia4-18-immersion-course
- Mark as New
- Bookmark
- Subscribe
- Mute
- Subscribe to RSS Feed
- Permalink
- Report Inappropriate Content
Added a "Preface" section at the start of the article covering the new "Change Report" SmartConsole Extension, including various screenshots of the report output and the new "Changes" buttons that are scattered around in the SmartConsole.
Gaia 4.18 (R82) Immersion Tips, Tricks, & Best Practices Video Course
Now Available at https://shadowpeak.com/gaia4-18-immersion-course
Now Available at https://shadowpeak.com/gaia4-18-immersion-course
- Mark as New
- Bookmark
- Subscribe
- Mute
- Subscribe to RSS Feed
- Permalink
- Report Inappropriate Content
So with the "revert to revision" feature in r80.40 you can revert to a point back in history and by doing that you would lose all the newer revisions, objects, etc that are more recent, right? But you could keep reverting to older revisions, correct?
How was it in r77.30? Could you move back and forward between revisions?
Couldn't we get the best of both strategies policy version reinstall and database revision revert without the need to do the investigation to fix the database revision?
I guess it would be good if policy installations and revision were linked and then in case of panic we could install policies back and forward until we get to a solid old policity intallation. Once there it would be nice to have a buttom to fix and consolidate the database revision required to be in sync with that policy version.
Leaderboard
Epsum factorial non deposit quid pro quo hic escorol.
| User | Count |
|---|---|
| 17 | |
| 14 | |
| 13 | |
| 9 | |
| 8 | |
| 6 | |
| 4 | |
| 4 | |
| 4 | |
| 4 |
Upcoming Events
Tue 10 Feb 2026 @ 03:00 PM (CET)
NIS2 Compliance in 2026: Tactical Tools to Assess, Secure, and ComplyTue 10 Feb 2026 @ 02:00 PM (EST)
Defending Hyperconnected AI-Driven Networks with Hybrid Mesh SecurityThu 12 Feb 2026 @ 05:00 PM (CET)
AI Security Masters Session 3: AI-Generated Malware - From Experimentation to Operational RealityFri 13 Feb 2026 @ 10:00 AM (CET)
CheckMates Live Netherlands - Sessie 43: Terugblik op de Check Point Sales Kick Off 2026Thu 19 Feb 2026 @ 03:00 PM (EST)
Americas Deep Dive: Check Point Management API Best PracticesTue 10 Feb 2026 @ 03:00 PM (CET)
NIS2 Compliance in 2026: Tactical Tools to Assess, Secure, and ComplyTue 10 Feb 2026 @ 02:00 PM (EST)
Defending Hyperconnected AI-Driven Networks with Hybrid Mesh SecurityFri 13 Feb 2026 @ 10:00 AM (CET)
CheckMates Live Netherlands - Sessie 43: Terugblik op de Check Point Sales Kick Off 2026Thu 19 Feb 2026 @ 03:00 PM (EST)
Americas Deep Dive: Check Point Management API Best PracticesAbout CheckMates
Learn Check Point
Advanced Learning
YOU DESERVE THE BEST SECURITY
©1994-2026 Check Point Software Technologies Ltd. All rights reserved.
Copyright
Privacy Policy
About Us
UserCenter


