Below are the instructions I have used to setup a SMB device with Smart-1 Cloud.
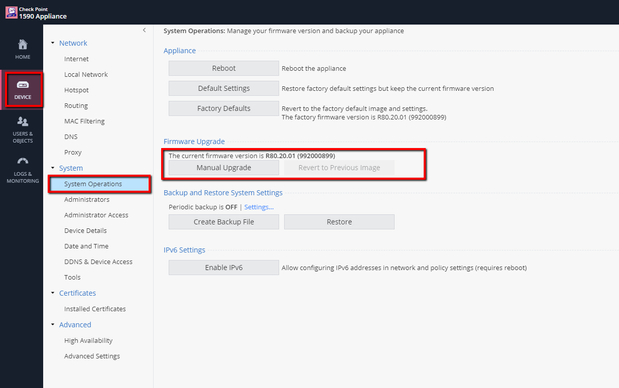
- You have to upgrade the device to version to support Smart-1 Cloud:
![1.png 1.png](https://community.checkpoint.com/t5/image/serverpage/image-id/7308i47DC44AC05BF4F99/image-dimensions/619x388?v=v2)
![1.png 1.png](https://community.checkpoint.com/t5/image/serverpage/image-id/7309i4A1EFC8A98B93E74/image-size/large?v=v2&px=999)
![1.png 1.png](https://community.checkpoint.com/t5/image/serverpage/image-id/7310iA2AA1333369A0DC4/image-size/large?v=v2&px=999)
2. Once this is done, then we can go ahead and set up the SMB device with Smart-1 Cloud:
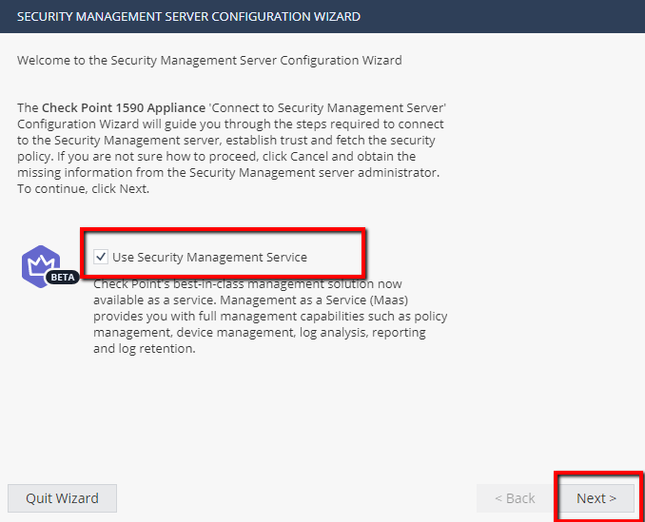
- In the first time configuration wizard, select SECURITY MANAGEMENT SERVICE option as shown below:
![1.png 1.png](https://community.checkpoint.com/t5/image/serverpage/image-id/7311i1933750E44222360/image-size/large?v=v2&px=999)
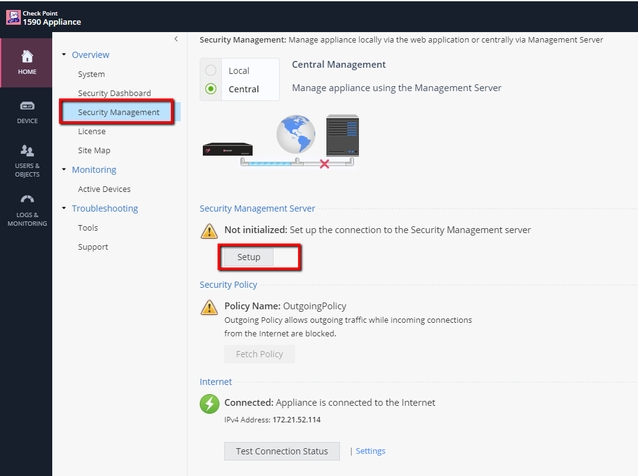
- After completing the first time wizard – Navigate to the security management section (shown below).
![1.png 1.png](https://community.checkpoint.com/t5/image/serverpage/image-id/7312i9A8DE26291A204B6/image-dimensions/639x477?v=v2)
![1.png 1.png](https://community.checkpoint.com/t5/image/serverpage/image-id/7313i5AA58F22C86BD19E/image-dimensions/645x522?v=v2)
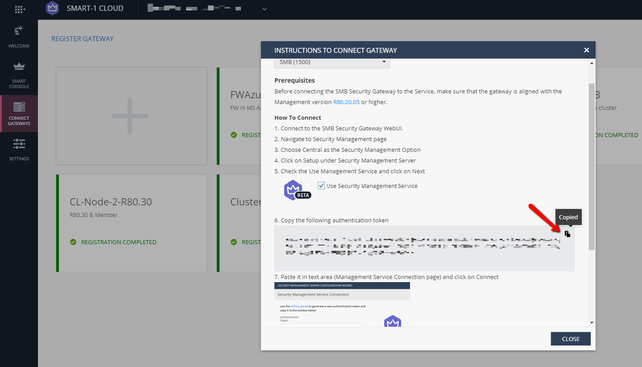
- Then navigate to the Portal and copy the Configuration Token (Shown below):
![1.png 1.png](https://community.checkpoint.com/t5/image/serverpage/image-id/7314i0E2F7DA04D413537/image-dimensions/643x367?v=v2)
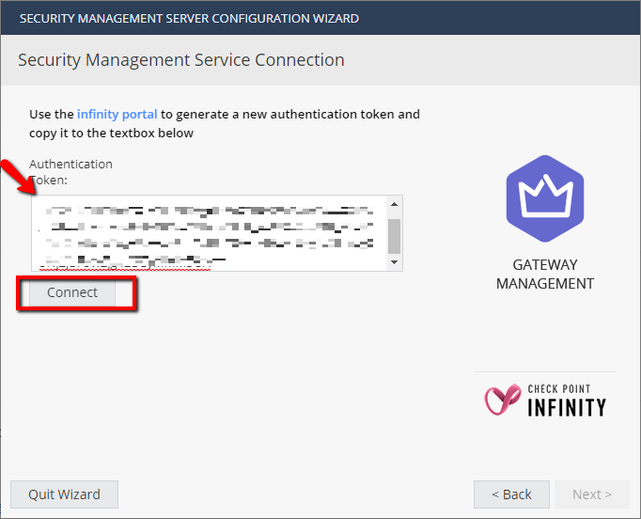
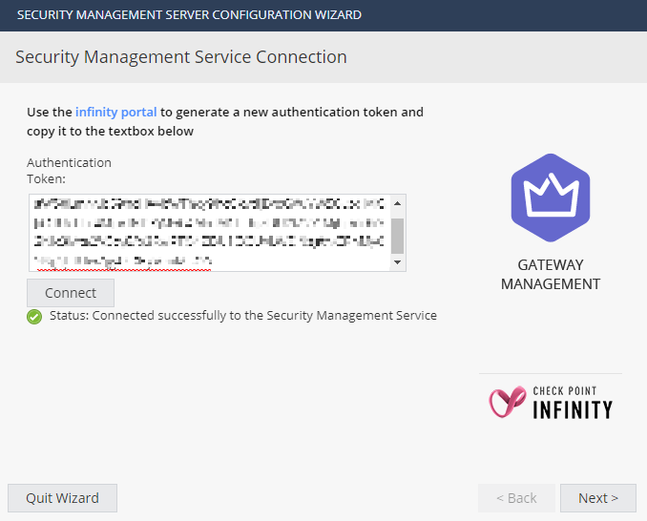
- Paste this token in the appliance Web UI (Shown below):
![1.png 1.png](https://community.checkpoint.com/t5/image/serverpage/image-id/7315iB0AB0B945F228A40/image-dimensions/641x519?v=v2)
![1.png 1.png](https://community.checkpoint.com/t5/image/serverpage/image-id/7316i0923BFC94C6A0C6A/image-dimensions/647x521?v=v2)
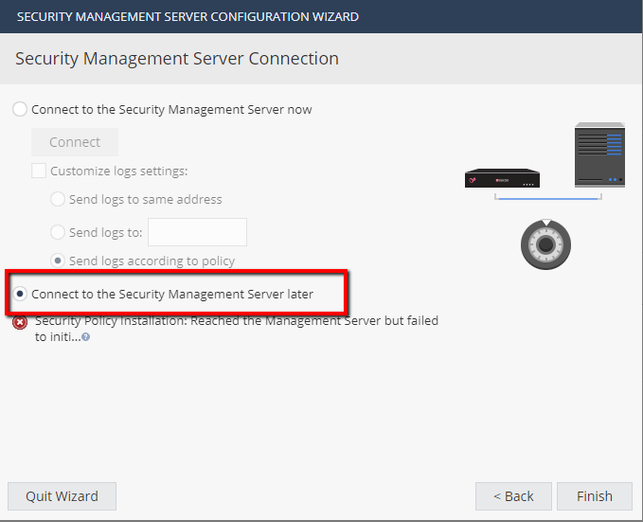
NOTE: The above will not work if you have not upgraded the firmware of your SMB device to R80.20.05 or higher.
![1.png 1.png](https://community.checkpoint.com/t5/image/serverpage/image-id/7317i7B41E293EB576666/image-dimensions/643x522?v=v2)
Then navigate to the Smart Console and establish SIC (use key entered during the first time config wizard).
![1.png 1.png](https://community.checkpoint.com/t5/image/serverpage/image-id/7318i5D5506FAD50FDF98/image-size/large?v=v2&px=999)
![1.png 1.png](https://community.checkpoint.com/t5/image/serverpage/image-id/7319i92DA0CBD0D1FDC5D/image-size/large?v=v2&px=999)
- Let the Management server complete the information gathering from the Appliance.
![2.png 2.png](https://community.checkpoint.com/t5/image/serverpage/image-id/7320iBA070017DC9F058D/image-size/large?v=v2&px=999)
![3.png 3.png](https://community.checkpoint.com/t5/image/serverpage/image-id/7321iE3185B831A53EAC4/image-size/large?v=v2&px=999)
- You can confirm the maas status from the CLI (Shown below).
![4.png 4.png](https://community.checkpoint.com/t5/image/serverpage/image-id/7322iB727C06807E017FB/image-size/large?v=v2&px=999)
- Once completed you should be able to successfully push policy to the SMB appliance from the Smart console.
![5.png 5.png](https://community.checkpoint.com/t5/image/serverpage/image-id/7323i502D9379869DA9A7/image-size/large?v=v2&px=999)
Hope the above is helpful.