- Products
Network & SASE IoT Protect Maestro Management OpenTelemetry/Skyline Remote Access VPN SASE SD-WAN Security Gateways SmartMove Smart-1 Cloud SMB Gateways (Spark) Threat PreventionCloud Cloud Network Security CloudMates General CloudGuard - WAF Talking Cloud Podcast Weekly ReportsSecurity Operations Events External Risk Management Incident Response Infinity AI Infinity Portal NDR Playblocks SOC XDR/XPR Threat Exposure Management
- Learn
- Local User Groups
- Partners
- More
This website uses Cookies. Click Accept to agree to our website's cookie use as described in our Privacy Policy. Click Preferences to customize your cookie settings.
- Products
- AI Security
- Developers & More
- Check Point Trivia
- CheckMates Toolbox
- General Topics
- Products Announcements
- Threat Prevention Blog
- Upcoming Events
- Americas
- EMEA
- Czech Republic and Slovakia
- Denmark
- Netherlands
- Germany
- Sweden
- United Kingdom and Ireland
- France
- Spain
- Norway
- Ukraine
- Baltics and Finland
- Greece
- Portugal
- Austria
- Kazakhstan and CIS
- Switzerland
- Romania
- Turkey
- Belarus
- Belgium & Luxembourg
- Russia
- Poland
- Georgia
- DACH - Germany, Austria and Switzerland
- Iberia
- Africa
- Adriatics Region
- Eastern Africa
- Israel
- Nordics
- Middle East and Africa
- Balkans
- Italy
- Bulgaria
- Cyprus
- APAC
CheckMates Fest 2026
Join the Celebration!
AI Security Masters
E1: How AI is Reshaping Our World
MVP 2026: Submissions
Are Now Open!
What's New in R82.10?
Watch NowOverlap in Security Validation
Help us to understand your needs better
CheckMates Go:
R82.10 and Rationalizing Multi Vendor Security Policies
Turn on suggestions
Auto-suggest helps you quickly narrow down your search results by suggesting possible matches as you type.
Showing results for
- CheckMates
- :
- Products
- :
- Network & SASE
- :
- Management
- :
- How to create a TRUSTED ROOT CA?
Options
- Subscribe to RSS Feed
- Mark Topic as New
- Mark Topic as Read
- Float this Topic for Current User
- Bookmark
- Subscribe
- Mute
- Printer Friendly Page
Turn on suggestions
Auto-suggest helps you quickly narrow down your search results by suggesting possible matches as you type.
Showing results for
Are you a member of CheckMates?
×
Sign in with your Check Point UserCenter/PartnerMap account to access more great content and get a chance to win some Apple AirPods! If you don't have an account, create one now for free!
- Mark as New
- Bookmark
- Subscribe
- Mute
- Subscribe to RSS Feed
- Permalink
- Report Inappropriate Content
Jump to solution
How to create a TRUSTED ROOT CA?
Has anyone created a “Trusted Root CA” (root-ca.crt) that is not recognized by the client computer? I followed the guide for this poc to get the cert:

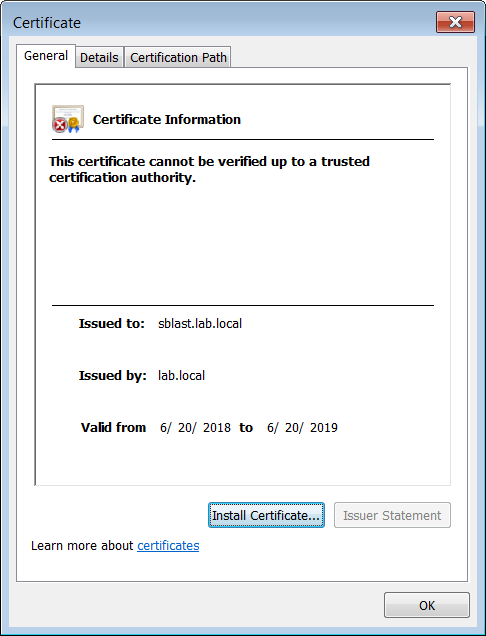
I did change the name (sblast.lab.local) but everything is the same ....when I import it:
The docs states there should not be any issues and look like this:
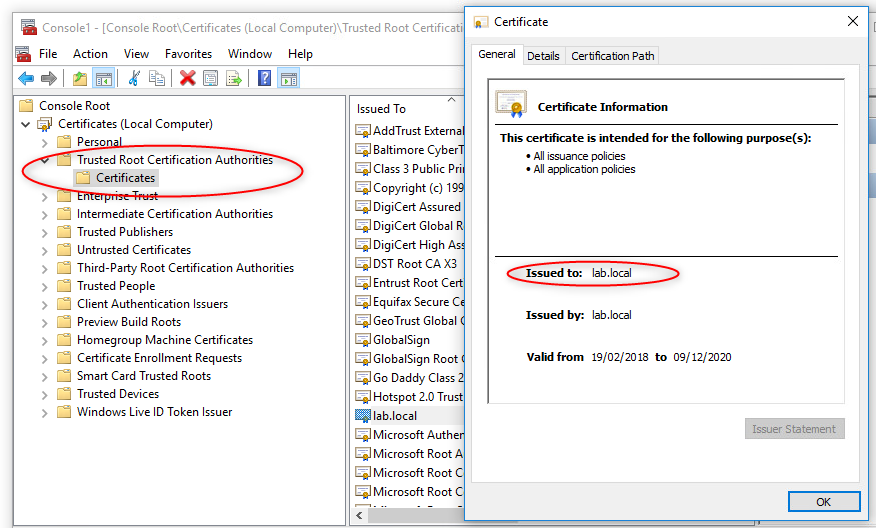
Any ideas how to resolve it or find another means to get a working “Trusted Root CA"? I also saw SK 113599 but decided to use this doc.
Ed
1 Solution
Accepted Solutions
- Mark as New
- Bookmark
- Subscribe
- Mute
- Subscribe to RSS Feed
- Permalink
- Report Inappropriate Content
Here are the exact steps and file.
6.1 Create a CA certificate
Login to the SB appliances via SSH and follow these steps:
(sba_openssl.cnf might be completely omitted if you use FQDN throughout all SBA config steps)
Ignore all warning outputs you get when running the cpopenssl commands 🙂
1) Create /tmp/sba_openssl.cnf (change CN, DNS and IP according to your SB appliance settings) and insert this content:
[ req ]
prompt = no default_bits = 4096
distinguished_name = req_distinguished_name
x509_extensions = req_ext
[ req_distinguished_name ]
C=DE
ST=BY
O=CP
OU=SB
CN=sblast.lab.local
[ req_ext ]
subjectAltName = @alternate_names
[alternate_names]
DNS.1=sblast.lab.local
DNS.2=10.200.75.50
IP.1=10.200.75.50
2) Create CA private key
# cpopenssl genrsa -aes256 –out ca-root.key 2048
3) Create CA certificate
# cpopenssl req -x509 -new -nodes -extensions v3_ca -key ca-root.key -days 1024 -out ca-root.crt -sha512 -config /var/opt/CPshrd-R77/conf/openssl.cnf
Be sure to set the common name to your domain only. Common Name (e.g. server FQDN or YOUR name) []: lab.local
6.2 Create SandBlast UserCheck certificate
1) Create Server private key
# cpopenssl genrsa -out sblast.local.key 4096
2) Create certificate signing request
# cpopenssl req -new -key sblast.lab.local.key -sha512 -subj "/C=DE/ST=BY/O=CheckPoint/CN=sblast.lab.local" -config /tmp/sba_openssl.cnf -out sblast.lab.local.csr
3) Create server public certificate
# cpopenssl x509 -req -in sblast.lab.local.csr -CA ca-root.crt -CAkey ca-root.key -CAcreateserial -extensions req_ext -extfile /tmp/sba_openssl.cnf -out sblast.lab.local.crt -days 365 -sha512
4) Convert server certificate to PKCS#12
# cpopenssl pkcs12 -export -in sblast.lab.local.crt -inkey sblast.lab.local.key -out sblast.lab.local.p12 -certfile ca-root.crt
==============================
NOTE: I think the problem might the "RED" font area.
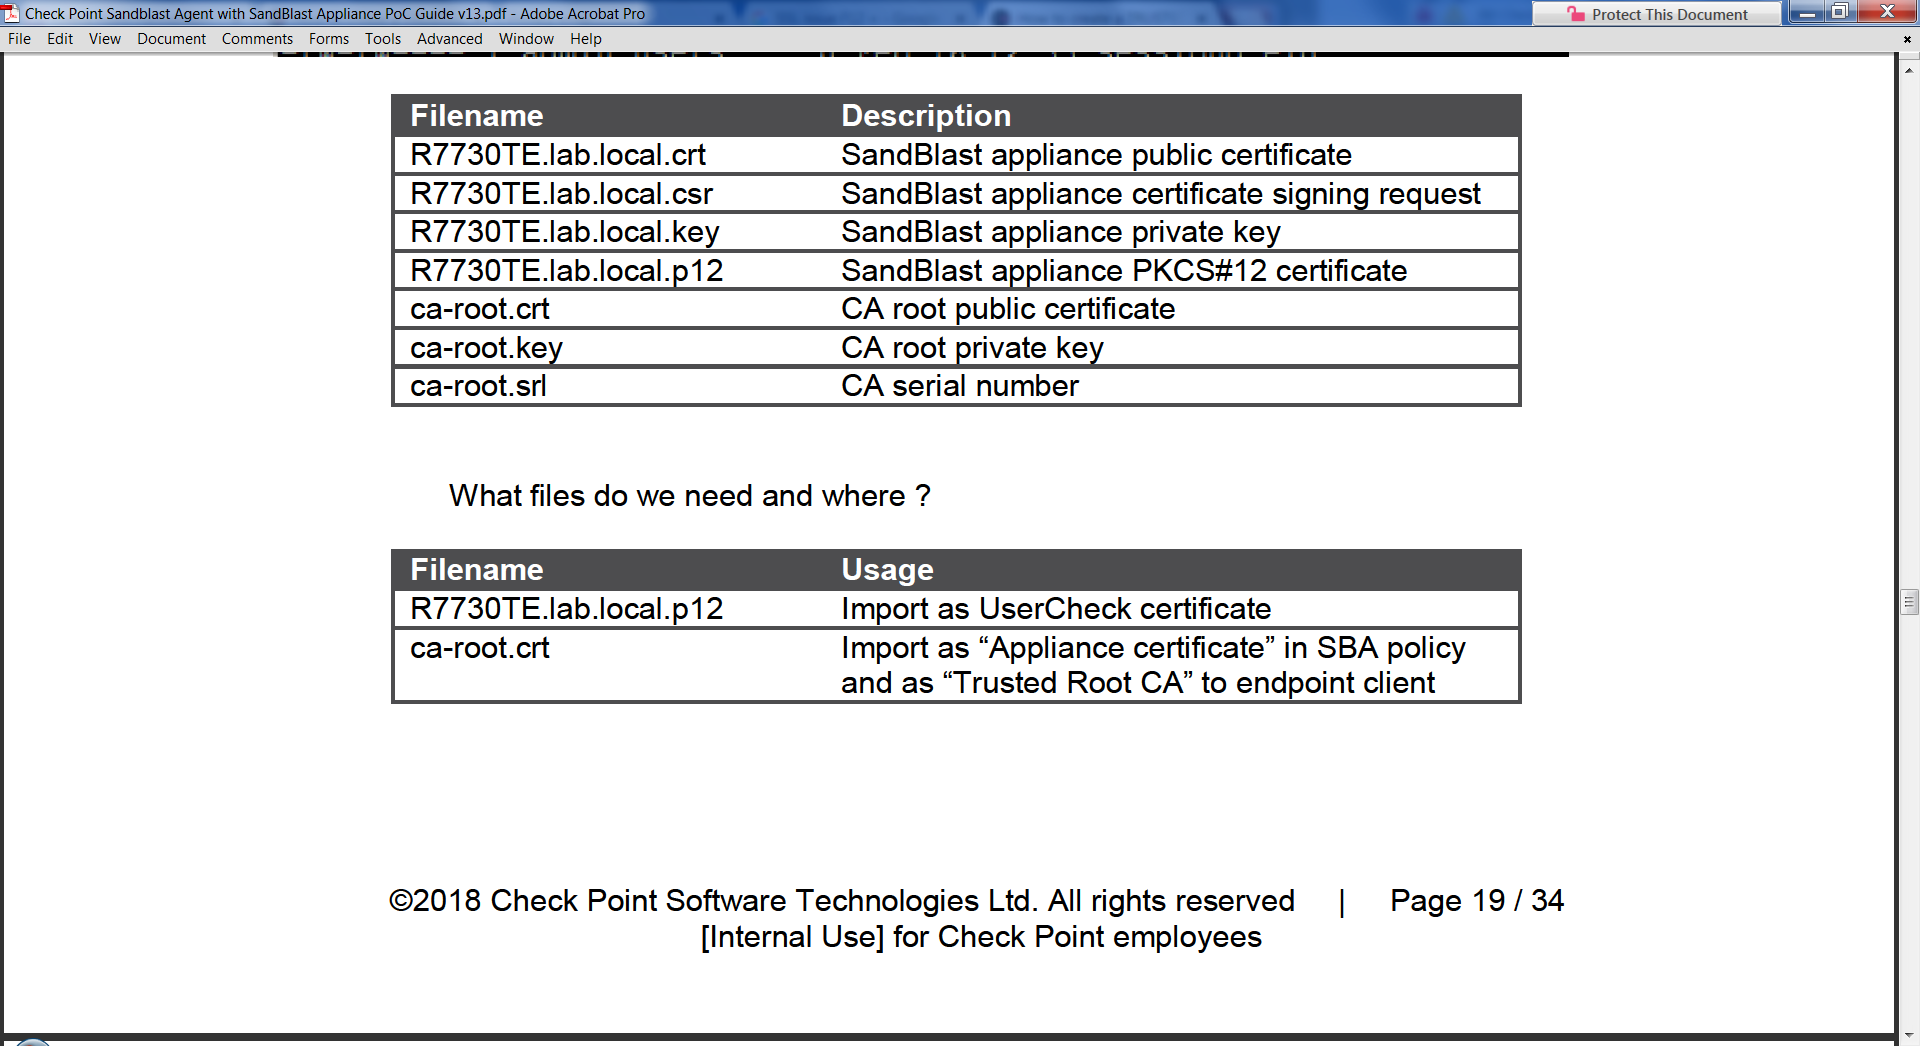
The two important files are "R7730TE.lab.local.p12" and ca-root.crt. It's the ca-root.crt that I'm installing on my labtop/client.
16 Replies
- Mark as New
- Bookmark
- Subscribe
- Mute
- Subscribe to RSS Feed
- Permalink
- Report Inappropriate Content
Your screenshot for when you imported it doesn't show...it points to Gmail.
You might want to download it and reattach to the above message.
- Mark as New
- Bookmark
- Subscribe
- Mute
- Subscribe to RSS Feed
- Permalink
- Report Inappropriate Content
- Mark as New
- Bookmark
- Subscribe
- Mute
- Subscribe to RSS Feed
- Permalink
- Report Inappropriate Content
If you are getting browser errors maybe the problem is with the end certificate, not the root CA certificate.
Your certificate might be missing a subject alternate name or the redirect URL doesn't match the CN or any alternate name.
What does the browser tell you about the error? Hit F12 > Security. It will tell you the exact reason for the error. Share with us.
- Mark as New
- Bookmark
- Subscribe
- Mute
- Subscribe to RSS Feed
- Permalink
- Report Inappropriate Content
Hi Pedro. Thanks for the quick reply. That's exactly what I'm thinking and last night spend some time trying to review the steps in the command. It looks like it does read off it too... Here is the actual file (sba_openssl.cnf) that is initially setup. Once I run the commands and generate the cert it ask me for C, ST, O...etc. and I was entering diff info but tried to match them last night but no luck.

I'll look into the area you suggested and follow up.
- Mark as New
- Bookmark
- Subscribe
- Mute
- Subscribe to RSS Feed
- Permalink
- Report Inappropriate Content
Here is the error.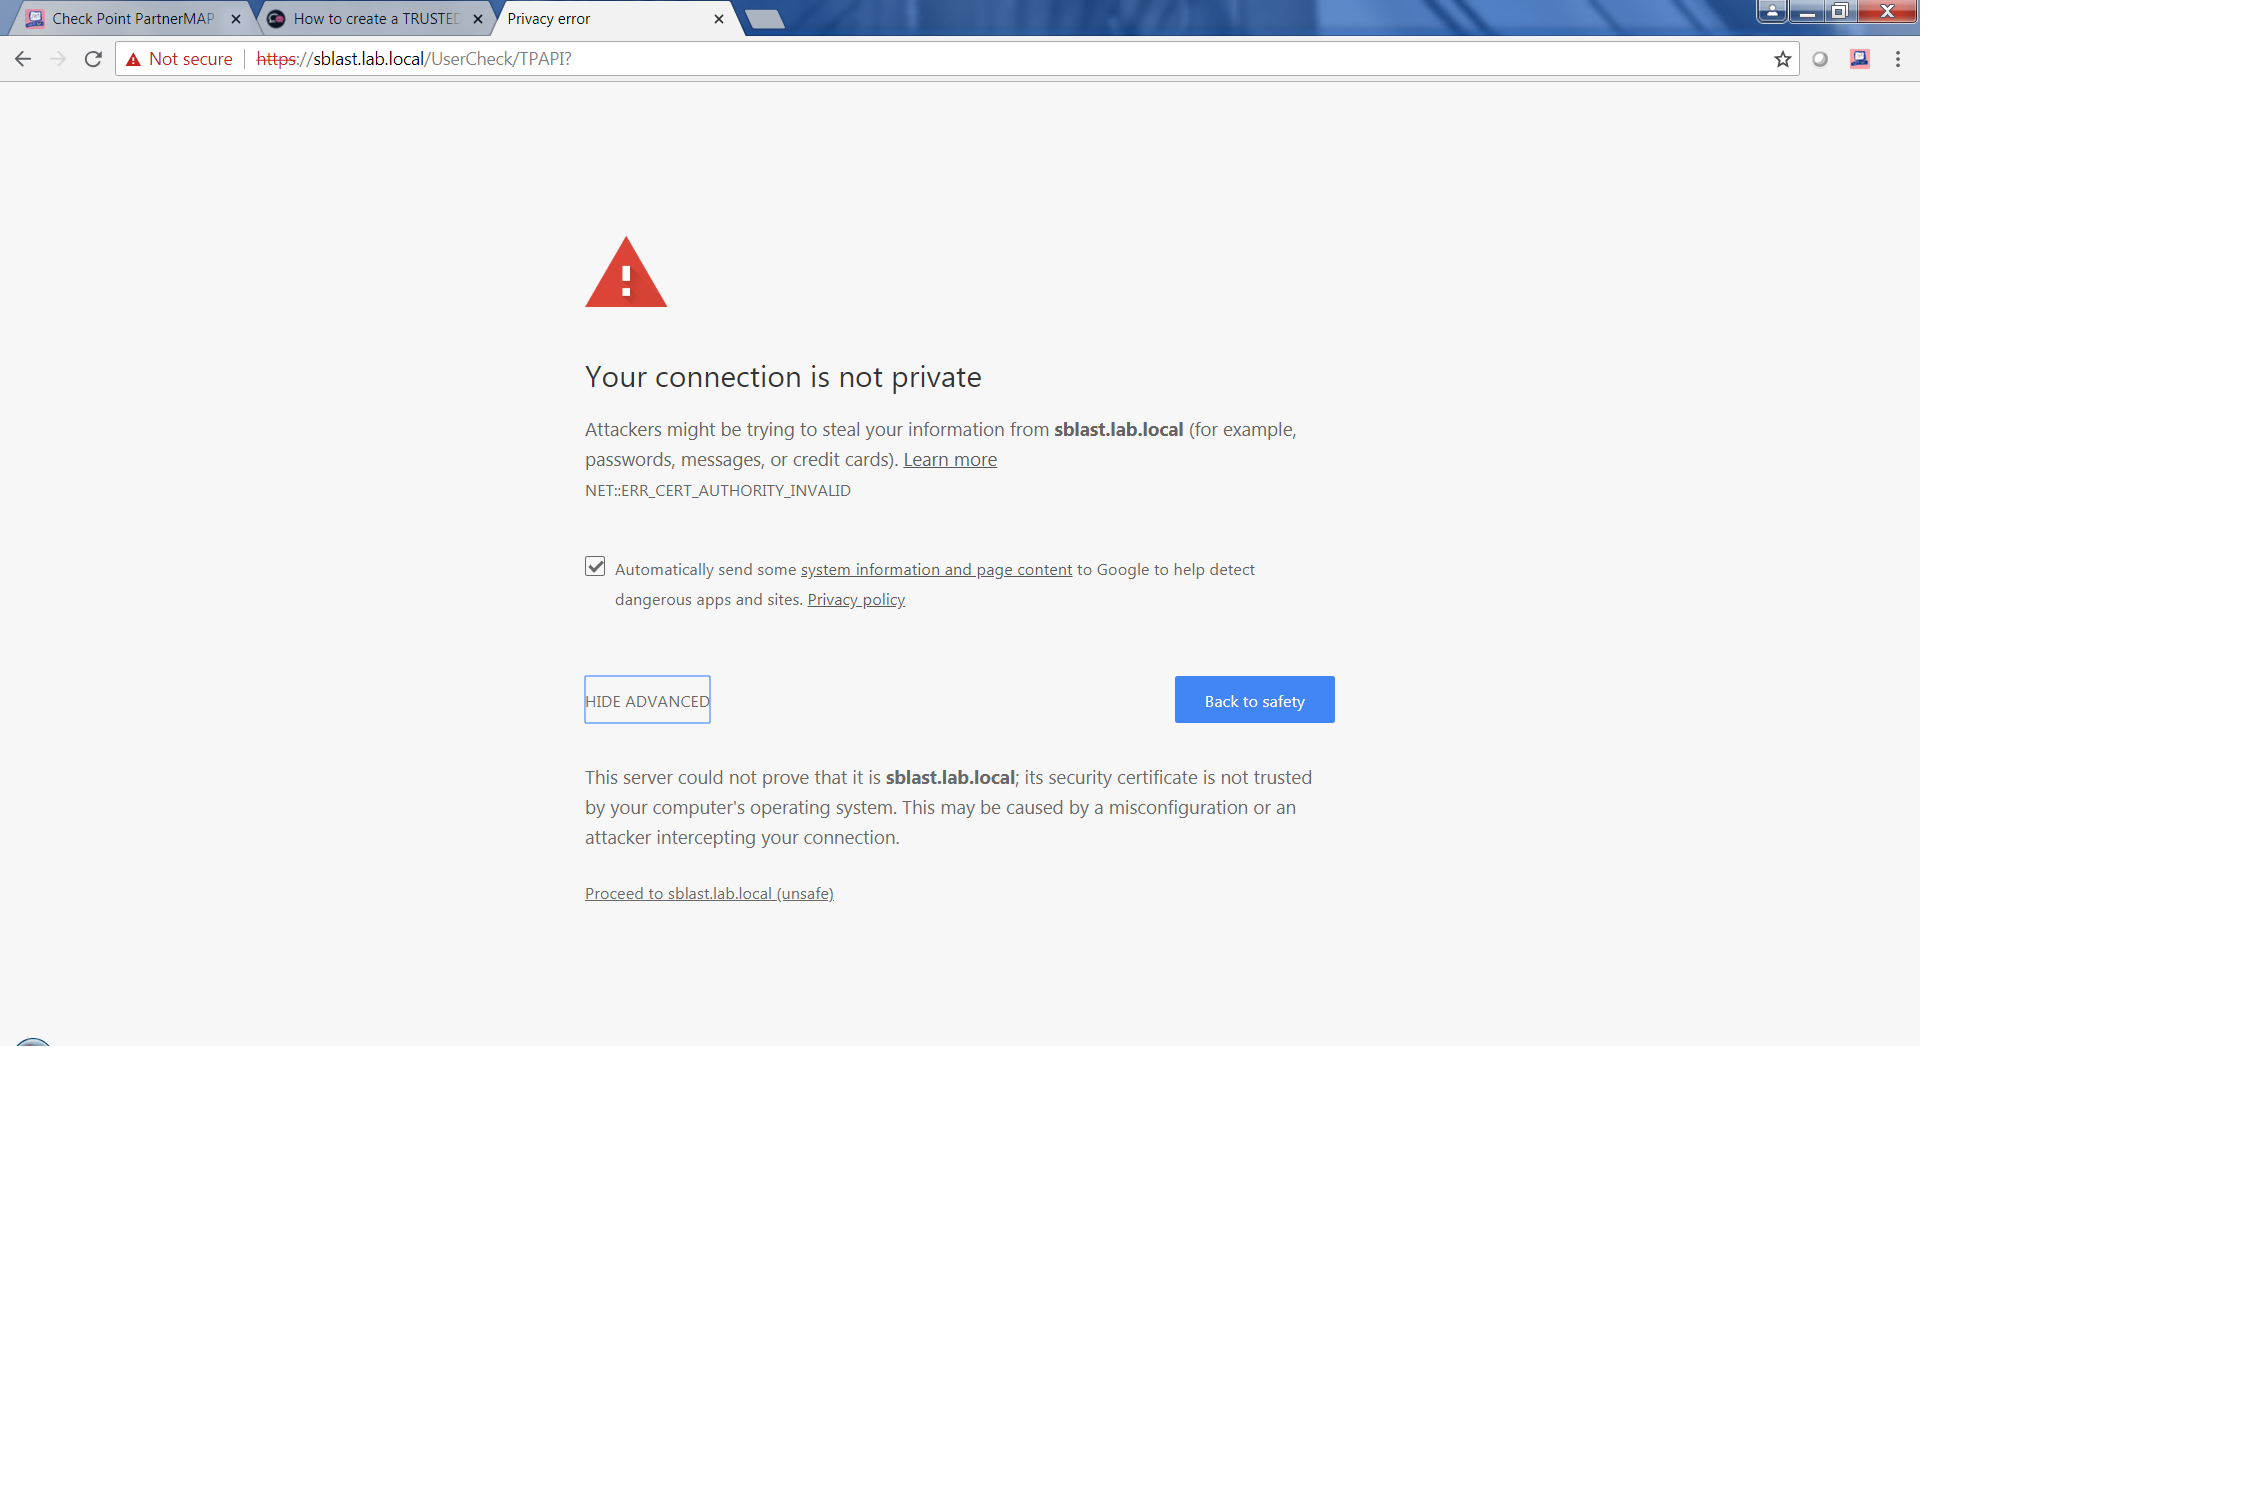
- Mark as New
- Bookmark
- Subscribe
- Mute
- Subscribe to RSS Feed
- Permalink
- Report Inappropriate Content
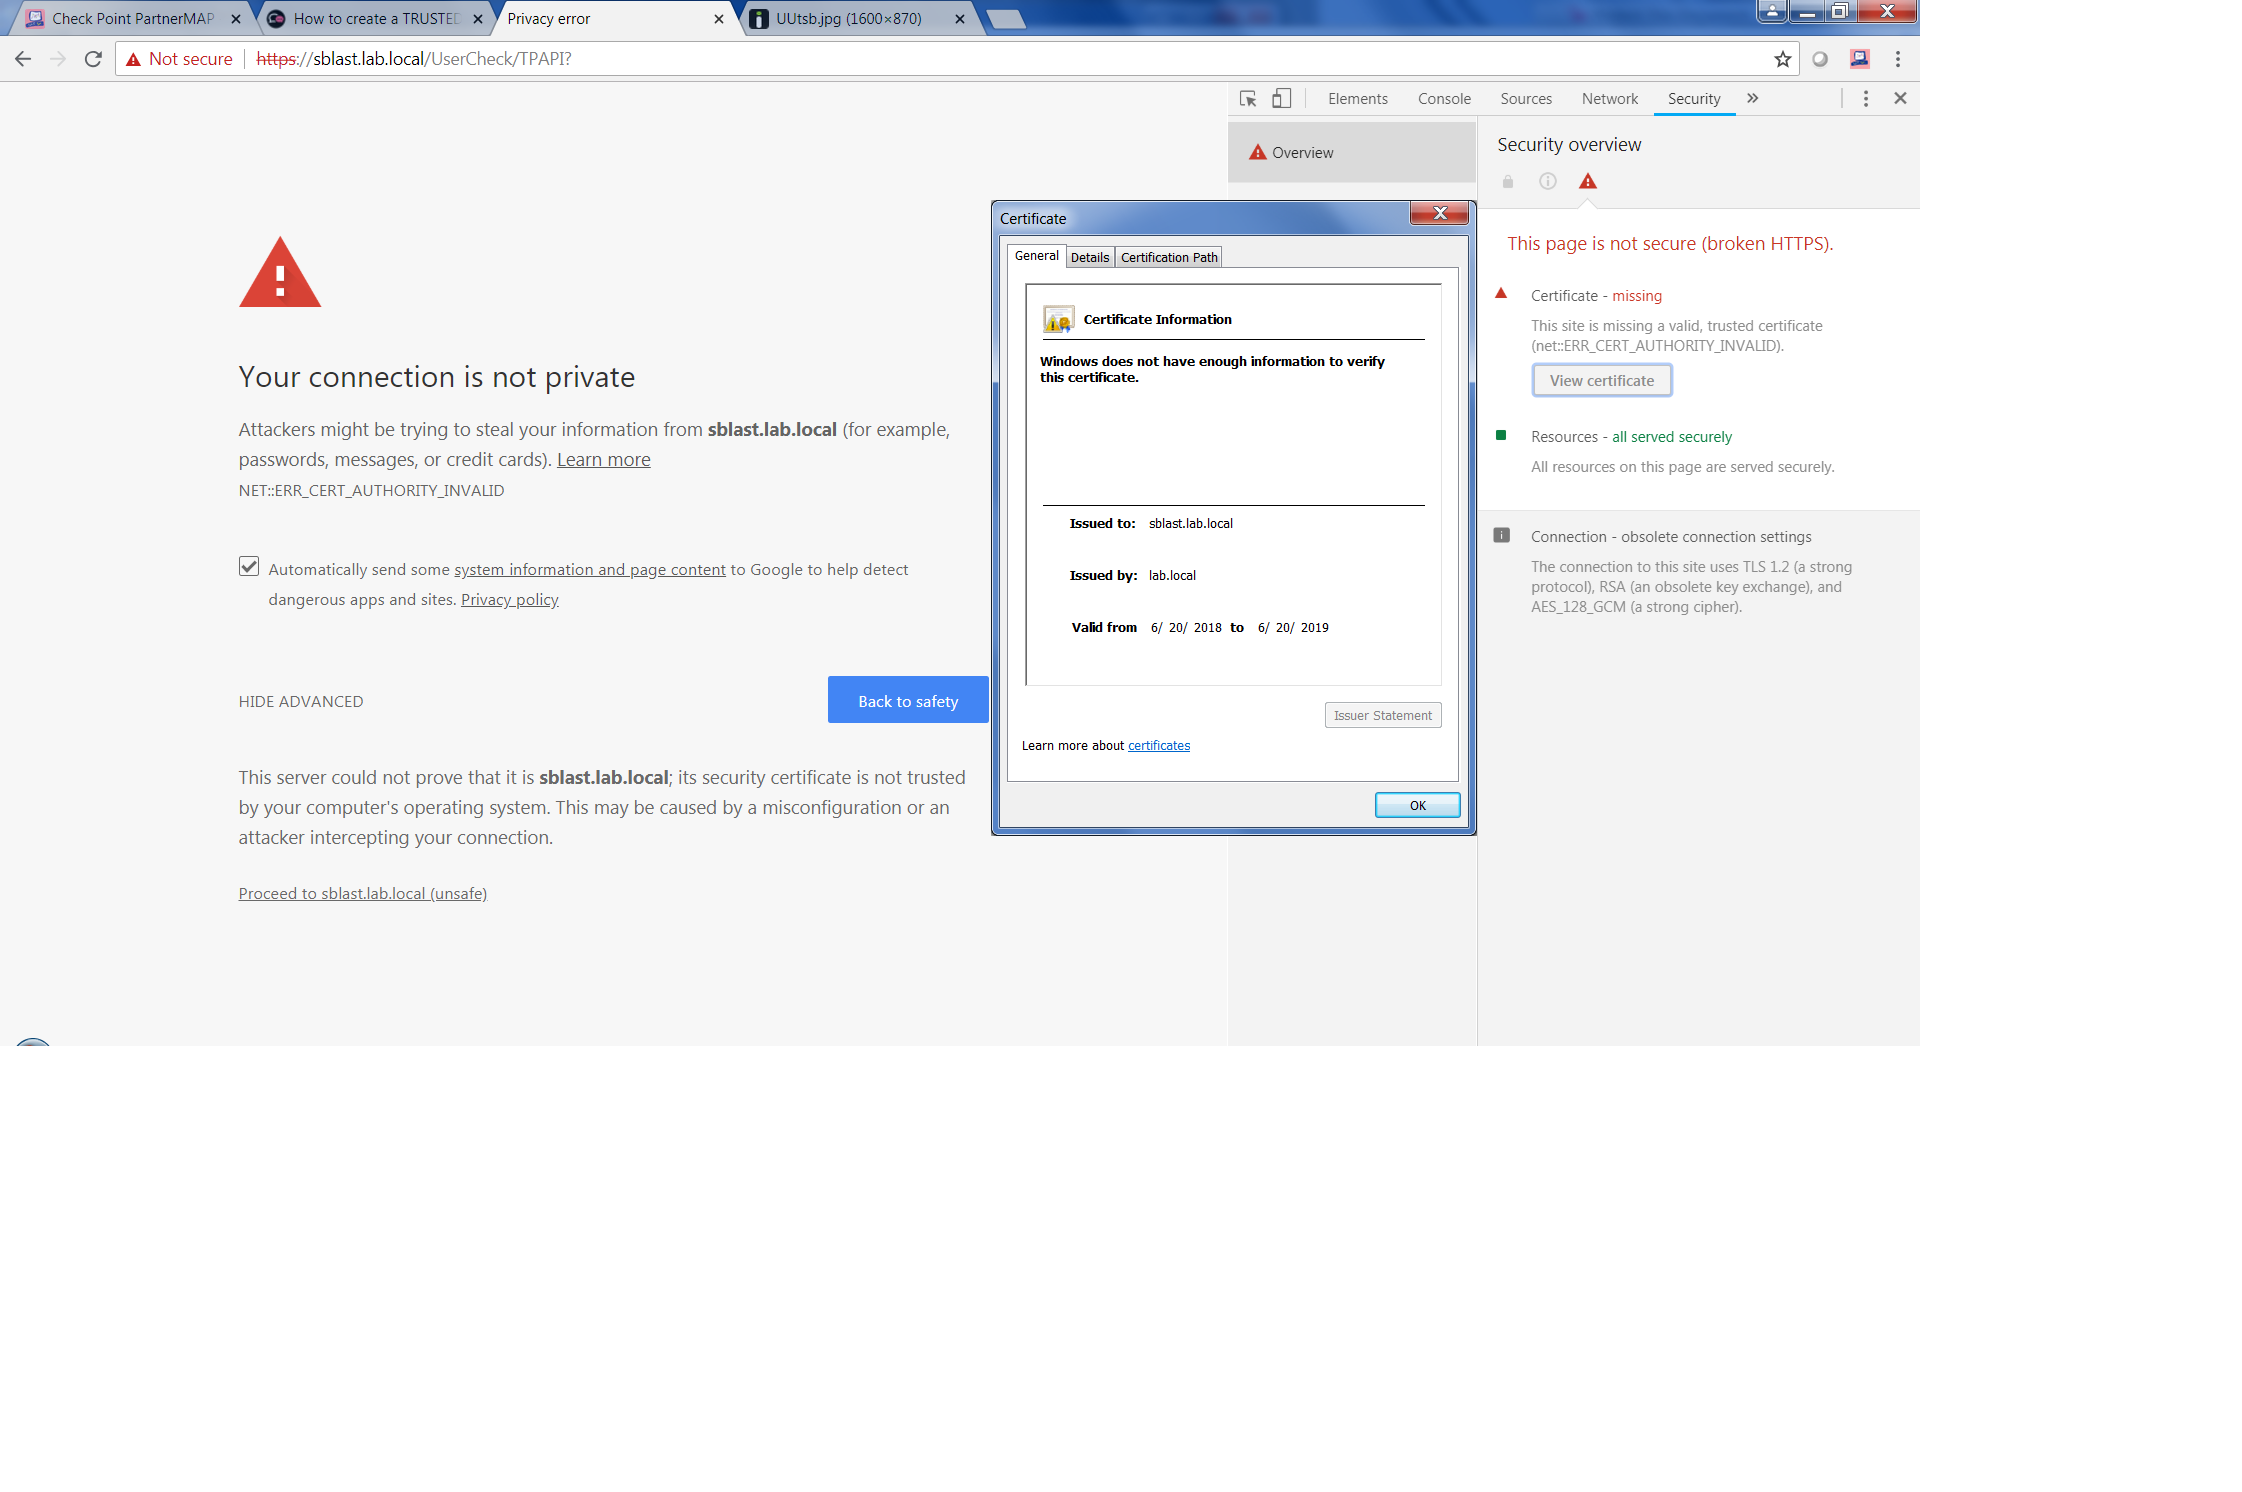
- Mark as New
- Bookmark
- Subscribe
- Mute
- Subscribe to RSS Feed
- Permalink
- Report Inappropriate Content
On the browser, hit F12 and go to the "Security" tab to see more details.
Also, open the certificate and check the certification path.
- Mark as New
- Bookmark
- Subscribe
- Mute
- Subscribe to RSS Feed
- Permalink
- Report Inappropriate Content
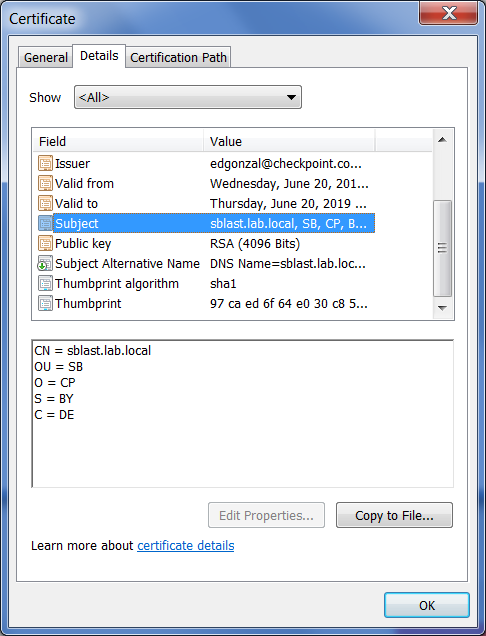
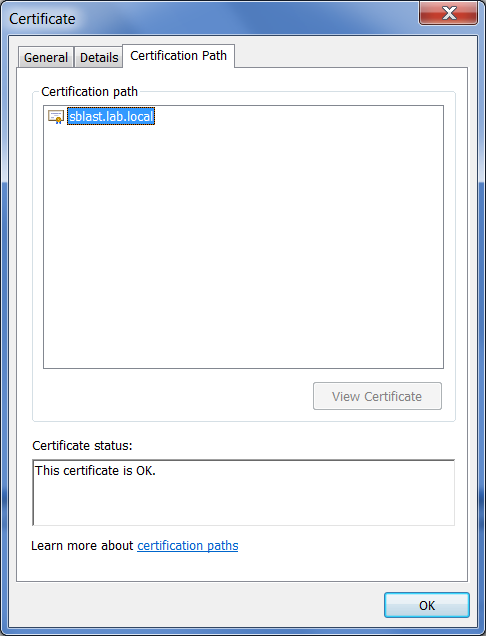
Here is more info.
- Mark as New
- Bookmark
- Subscribe
- Mute
- Subscribe to RSS Feed
- Permalink
- Report Inappropriate Content
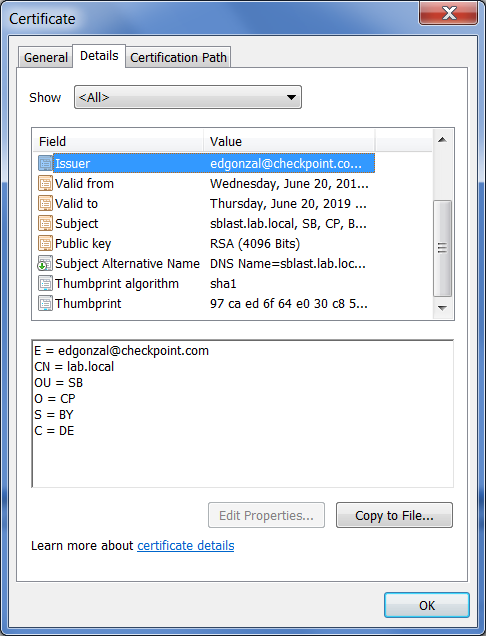
- Mark as New
- Bookmark
- Subscribe
- Mute
- Subscribe to RSS Feed
- Permalink
- Report Inappropriate Content
Here are the exact steps and file.
6.1 Create a CA certificate
Login to the SB appliances via SSH and follow these steps:
(sba_openssl.cnf might be completely omitted if you use FQDN throughout all SBA config steps)
Ignore all warning outputs you get when running the cpopenssl commands 🙂
1) Create /tmp/sba_openssl.cnf (change CN, DNS and IP according to your SB appliance settings) and insert this content:
[ req ]
prompt = no default_bits = 4096
distinguished_name = req_distinguished_name
x509_extensions = req_ext
[ req_distinguished_name ]
C=DE
ST=BY
O=CP
OU=SB
CN=sblast.lab.local
[ req_ext ]
subjectAltName = @alternate_names
[alternate_names]
DNS.1=sblast.lab.local
DNS.2=10.200.75.50
IP.1=10.200.75.50
2) Create CA private key
# cpopenssl genrsa -aes256 –out ca-root.key 2048
3) Create CA certificate
# cpopenssl req -x509 -new -nodes -extensions v3_ca -key ca-root.key -days 1024 -out ca-root.crt -sha512 -config /var/opt/CPshrd-R77/conf/openssl.cnf
Be sure to set the common name to your domain only. Common Name (e.g. server FQDN or YOUR name) []: lab.local
6.2 Create SandBlast UserCheck certificate
1) Create Server private key
# cpopenssl genrsa -out sblast.local.key 4096
2) Create certificate signing request
# cpopenssl req -new -key sblast.lab.local.key -sha512 -subj "/C=DE/ST=BY/O=CheckPoint/CN=sblast.lab.local" -config /tmp/sba_openssl.cnf -out sblast.lab.local.csr
3) Create server public certificate
# cpopenssl x509 -req -in sblast.lab.local.csr -CA ca-root.crt -CAkey ca-root.key -CAcreateserial -extensions req_ext -extfile /tmp/sba_openssl.cnf -out sblast.lab.local.crt -days 365 -sha512
4) Convert server certificate to PKCS#12
# cpopenssl pkcs12 -export -in sblast.lab.local.crt -inkey sblast.lab.local.key -out sblast.lab.local.p12 -certfile ca-root.crt
==============================
NOTE: I think the problem might the "RED" font area.
The two important files are "R7730TE.lab.local.p12" and ca-root.crt. It's the ca-root.crt that I'm installing on my labtop/client.

- Mark as New
- Bookmark
- Subscribe
- Mute
- Subscribe to RSS Feed
- Permalink
- Report Inappropriate Content
Going to try something new... support just told me the following:
Based on the information that is on the case it seems it looks like we are not combining the CA certificate with the server cert. The next step here will be to follow sk69660 which is originally intended for Mobile Access. The steps are the same for UserCheck the only difference will be step 3, you will just have to import the certificate under the UserCheck tab.
I'll follow up on the results after lunch.
- Mark as New
- Bookmark
- Subscribe
- Mute
- Subscribe to RSS Feed
- Permalink
- Report Inappropriate Content
That is correct, the certificate is missing the root CA in the chain. There should be the lab.local certificate above the sblast.lab.local in the certification path.
In step 4, add the option -certfile ca-root.crt
- Mark as New
- Bookmark
- Subscribe
- Mute
- Subscribe to RSS Feed
- Permalink
- Report Inappropriate Content
Hey Pedro. Thanks your suggestion....it worked! For some reason the work laptop was probably the main issue since it was not working there. But, once I tried the lab computer it worked great! Thanks! Ed
- Mark as New
- Bookmark
- Subscribe
- Mute
- Subscribe to RSS Feed
- Permalink
- Report Inappropriate Content
Great to know, Ed!
Please mark this question as answered if everything is working.
- Mark as New
- Bookmark
- Subscribe
- Mute
- Subscribe to RSS Feed
- Permalink
- Report Inappropriate Content
FYI I marked Ed Gonzalez's answer correct and added your suggestion to step 4.
- Mark as New
- Bookmark
- Subscribe
- Mute
- Subscribe to RSS Feed
- Permalink
- Report Inappropriate Content
Great! Thanks
Leaderboard
Epsum factorial non deposit quid pro quo hic escorol.
| User | Count |
|---|---|
| 17 | |
| 16 | |
| 6 | |
| 5 | |
| 3 | |
| 3 | |
| 3 | |
| 3 | |
| 3 | |
| 2 |
Upcoming Events
Thu 08 Jan 2026 @ 05:00 PM (CET)
AI Security Masters Session 1: How AI is Reshaping Our WorldFri 09 Jan 2026 @ 10:00 AM (CET)
CheckMates Live Netherlands - Sessie 42: Looking back & forwardThu 22 Jan 2026 @ 05:00 PM (CET)
AI Security Masters Session 2: Hacking with AI: The Dark Side of InnovationTue 27 Jan 2026 @ 11:00 AM (EST)
CloudGuard Network Security for Red Hat OpenShift VirtualizationThu 08 Jan 2026 @ 05:00 PM (CET)
AI Security Masters Session 1: How AI is Reshaping Our WorldFri 09 Jan 2026 @ 10:00 AM (CET)
CheckMates Live Netherlands - Sessie 42: Looking back & forwardThu 22 Jan 2026 @ 05:00 PM (CET)
AI Security Masters Session 2: Hacking with AI: The Dark Side of InnovationTue 27 Jan 2026 @ 11:00 AM (EST)
CloudGuard Network Security for Red Hat OpenShift VirtualizationThu 26 Feb 2026 @ 05:00 PM (CET)
AI Security Masters Session 4: Powering Prevention: The AI Driving Check Point’s ThreatCloudAbout CheckMates
Learn Check Point
Advanced Learning
YOU DESERVE THE BEST SECURITY
©1994-2026 Check Point Software Technologies Ltd. All rights reserved.
Copyright
Privacy Policy
About Us
UserCenter


