- Products
- Learn
- Local User Groups
- Partners
- More

This website uses Cookies. Click Accept to agree to our website's cookie use as described in our Privacy Policy. Click Preferences to customize your cookie settings.
- Products
- Learn
- Local User Groups
- Upcoming Events
- Americas
- EMEA
- Czech Republic and Slovakia
- Denmark
- Netherlands
- Germany
- Sweden
- United Kingdom and Ireland
- France
- Spain
- Norway
- Ukraine
- Baltics and Finland
- Greece
- Portugal
- Austria
- Kazakhstan and CIS
- Switzerland
- Romania
- Turkey
- Belarus
- Belgium & Luxembourg
- Russia
- Poland
- Georgia
- DACH - Germany, Austria and Switzerland
- Iberia
- Africa
- Adriatics Region
- Eastern Africa
- Israel
- Nordics
- Middle East and Africa
- Balkans
- Italy
- Bulgaria
- Cyprus
- APAC
- Partners
- More
- ABOUT CHECKMATES & FAQ
- Sign In
- Leaderboard
- Events
On-Premise SD-WAN Management
Register HereWhat's New in R82.10?
Watch Here AI Security Masters E8:
Claude Mythos: New Era in Cyber Security
CheckMates Go:
The Moment Before
Turn on suggestions
Auto-suggest helps you quickly narrow down your search results by suggesting possible matches as you type.
Showing results for
- CheckMates
- :
- Products
- :
- Developers
- :
- API / CLI Discussion
- :
- How-to use Postman with R8x Security Management AP...
Options
- Subscribe to RSS Feed
- Mark Topic as New
- Mark Topic as Read
- Float this Topic for Current User
- Bookmark
- Subscribe
- Mute
- Printer Friendly Page
Turn on suggestions
Auto-suggest helps you quickly narrow down your search results by suggesting possible matches as you type.
Showing results for
Are you a member of CheckMates?
×
Sign in with your Check Point UserCenter/PartnerMap account to access more great content and get a chance to win some Apple AirPods! If you don't have an account, create one now for free!
- Mark as New
- Bookmark
- Subscribe
- Mute
- Subscribe to RSS Feed
- Permalink
- Report Inappropriate Content
How-to use Postman with R8x Security Management API
What is Postman
Postman is a free Google Chrome extension that can be used for testing and experimenting with web-services
You can find the latest postman collection file for R80 Security Management API here postman_collection.json
Installation
1) Launch "Google Chrome" and enter "chrome://apps" in the URL bar.

2) Open "Web Store"
3) Search for "Postman"

4) Click on "Add to Chrome" and the following should appear:

5) Add the app and then click on "Launch App"
Setup Postman to work with the R80 Security Management API
1) You can import a list of APIs into your Postman environment using Postman's "collection" feature. This stored list of APIs can help you avoid syntax errors and save you time finding APIs. The various Postman collections can be found as follows:
- API v 1.00 R80 - https://community.checkpoint.com/t5/API-CLI-Discussion-and-Samples/postman-collection-R80/td-p/38853
- API v 1.1 R80.10 - https://community.checkpoint.com/t5/API-CLI-Discussion-and-Samples/postman-collection-R80-10/td-p/38...
- API v 1.2 R80.20.M1 - https://community.checkpoint.com/t5/API-CLI-Discussion-and-Samples/postman-collection-R80-20-M1/td-p...
- API v 1.3 R80.20 GA - https://community.checkpoint.com/t5/API-CLI-Discussion-and-Samples/postman-collection-R80-20/td-p/40...
- API v 1.4 R80.20.M2 - https://community.checkpoint.com/t5/API-CLI-Discussion-and-Samples/postman-collection-R80-20-M2/td-p...
- API v 1.5 R80.30 - https://community.checkpoint.com/t5/API-CLI-Discussion-and-Samples/postman-collection-R80-30/m-p/539...
- API v 1.6 R80.40 - https://community.checkpoint.com/t5/API-CLI-Discussion-and-Samples/postman-collection-R80-40/m-p/739...
- API v 1.6.1 R80.40 JHF - https://community.checkpoint.com/t5/API-CLI-Discussion-and-Samples/postman-collection-1-6-1-API/m-p/...
- API v 1.7 R81 - https://community.checkpoint.com/t5/API-CLI-Discussion-and-Samples/postman-collection-R81/m-p/98125#...
- API v 1.8 R81.10 - https://community.checkpoint.com/t5/API-CLI-Discussion/postman-collection-R81-10-V2/m-p/130258#M6273
- API v 1.9 R81.20 - https://community.checkpoint.com/t5/API-CLI-Discussion/postman-collection-R81-20/m-p/162938#M7306
- API v 2.0 R82 - https://community.checkpoint.com/t5/API-CLI-Discussion/postman-collection-R82/m-p/230257#M8805
- API v 2.1 R82.10 - https://community.checkpoint.com/t5/API-CLI-Discussion/postman-collection-R82-10/m-p/266319#M9337
2) Launch Postman, and click on the "import collection" button.

3) Select "choose files" and select the collection file that you have. After selecting the file, you should see something like this:

4) On the left part of the screen, you should now see the text similar to "Web API – take hero3– 991000104". Click on this text, to see the list of API calls grouped by categories.

5) To set-up the environment variable, click on "Manage environments" and click on add


6) Add a key called "server" and set it with the value: https://<your-mgmt-ip-address>/web_api
7) Add a key called "session", you can leave its value empty.
8) Click the "Add" button, to exit this dialog.
9) Click the "X" button to exit the “Manage Environments” screen

Activating and testing the R80 Security Management API
1) Open SmartConsole R80, and login to the R80 Security Management
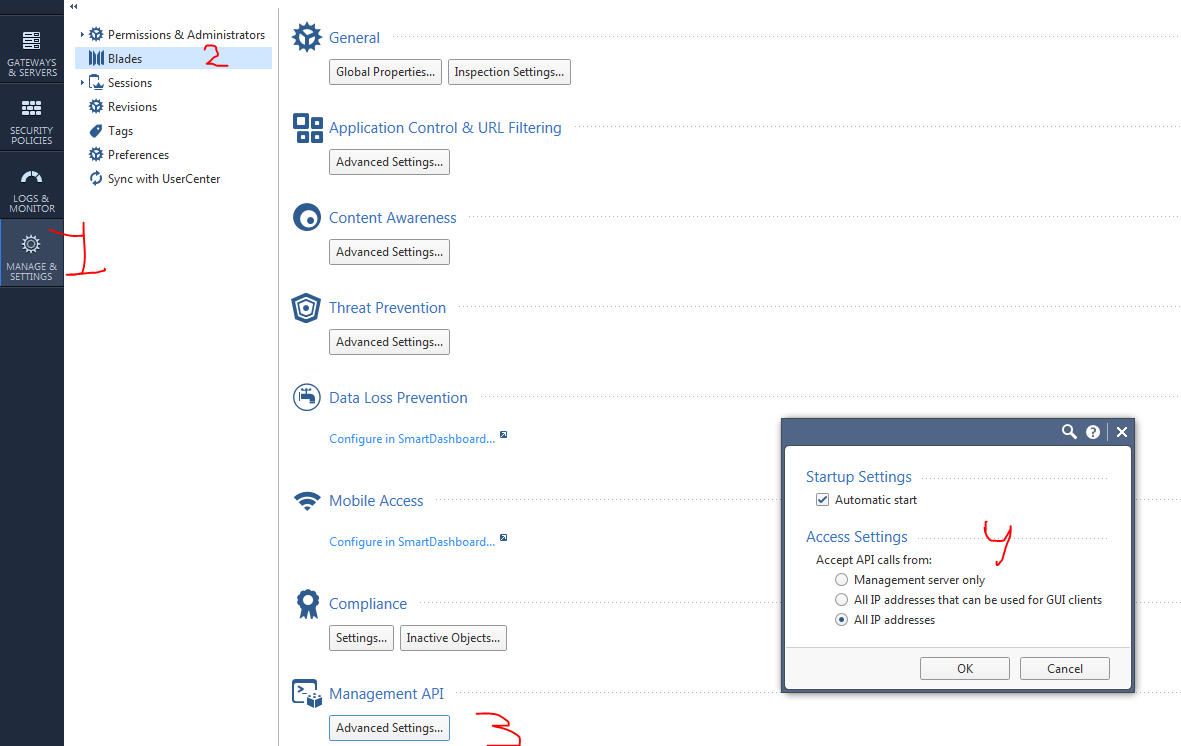
2) When the GUI is opened, go to : Manage & settings -> Blades -> Management API -> Advanced Settings
3) Check “Automatic start”, and pick “All IP Addresses that can be used for GUI clients or All IP addresses”.
4) Press OK

5) Publish
6) Run the command api reconf from clish
7) Make sure the management API server is up and running. Browse to: https://<your-mgmt-ip-address>/api_docs/
You need to accept the self signed certificate warning

8) You should now see the R80 Management API reference guide

9) In Postman:
(A) change the postman environment to the one you set in the previous step.
(B) locate the "Login" command in the list of APIs on the left and click on it.
(C) Change the values for the user-name and password.
(D) Click on the "send" button

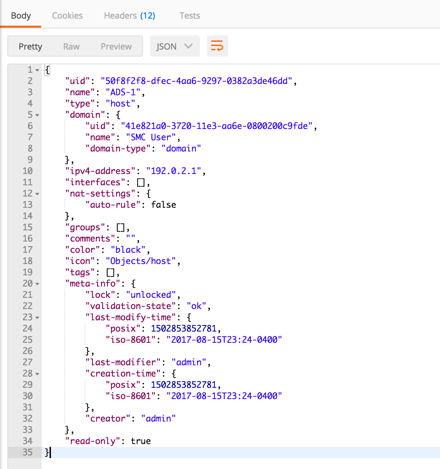
10) The output of the "Login" command contains a session-ID (sid) value. This value should be used by all other API calls in the same session as a way to prove the authenticity of the user behind the API call. To set the session-ID for subsequent API calls select the sid value, right click and select "Set:" -> "session".

11) You're done! Choose any other API calls from the collection and run it.
25 Replies
- Mark as New
- Bookmark
- Subscribe
- Mute
- Subscribe to RSS Feed
- Permalink
- Report Inappropriate Content
Postman is now available also as a native application for Mac and Windows: https://www.getpostman.com/apps
In the native apps, it is possible to avoid the certificate warnings by disabling "SSL certificate verification" (under "File > Settings > General" ).
- Mark as New
- Bookmark
- Subscribe
- Mute
- Subscribe to RSS Feed
- Permalink
- Report Inappropriate Content
To automatically set the session-ID (sid) value add the following under "Tests" on the login command:
var jsonData = JSON.parse(responseBody);
postman.setEnvironmentVariable("session", jsonData.sid);
- Mark as New
- Bookmark
- Subscribe
- Mute
- Subscribe to RSS Feed
- Permalink
- Report Inappropriate Content
- Mark as New
- Bookmark
- Subscribe
- Mute
- Subscribe to RSS Feed
- Permalink
- Report Inappropriate Content
Is it expected with Postman that when you push a change via API it doesn't show there is anything to publish? I went through an exercise running through some exercises and was confused when, after doing a send, I didn't see anything to publish??
--Juan
- Mark as New
- Bookmark
- Subscribe
- Mute
- Subscribe to RSS Feed
- Permalink
- Report Inappropriate Content
Hi Juan,
Can you share which commands you use?
- Mark as New
- Bookmark
- Subscribe
- Mute
- Subscribe to RSS Feed
- Permalink
- Report Inappropriate Content
- Mark as New
- Bookmark
- Subscribe
- Mute
- Subscribe to RSS Feed
- Permalink
- Report Inappropriate Content
Also I’m using the R80.10 api libraries.
- Mark as New
- Bookmark
- Subscribe
- Mute
- Subscribe to RSS Feed
- Permalink
- Report Inappropriate Content
Hi Juan,
Am I right that you are using a Cloud Demo Server?
I've just tried adding a host and publishing the change on a Cloud Demo Server and it looks like everything is OK.
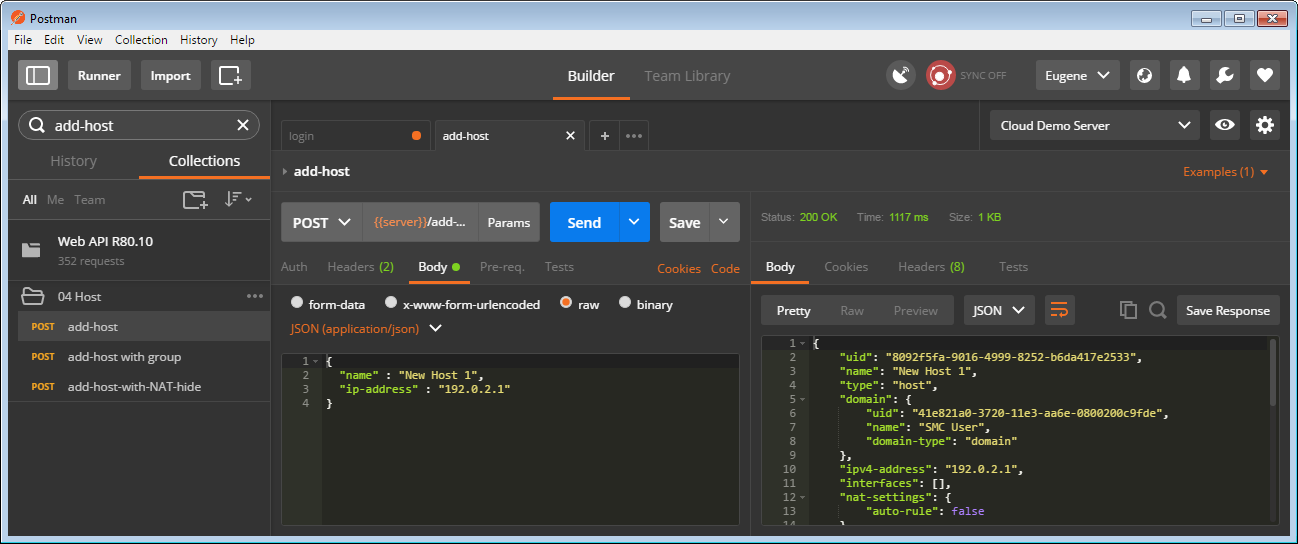
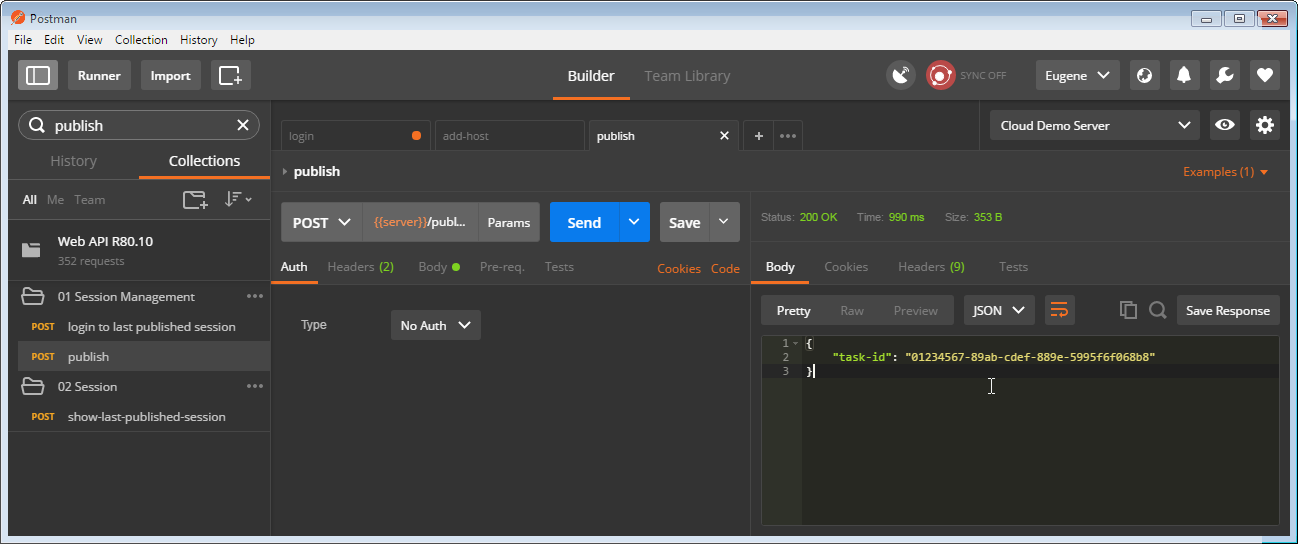
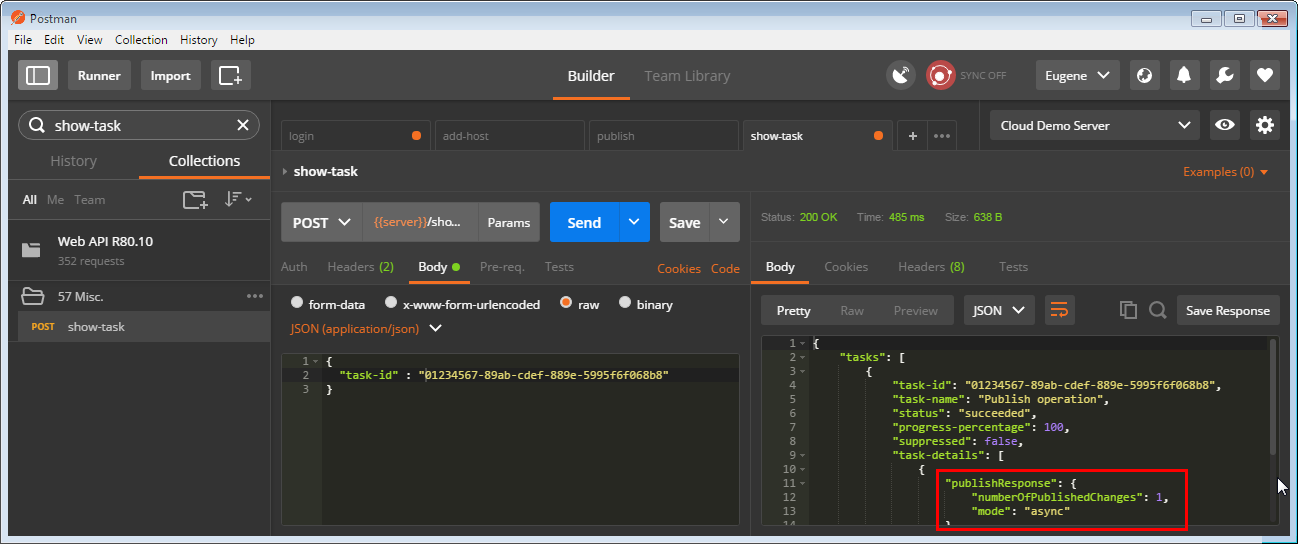
Are these operations the same to ones you are doing?
- Mark as New
- Bookmark
- Subscribe
- Mute
- Subscribe to RSS Feed
- Permalink
- Report Inappropriate Content
What's the best way to add multiple objects through API? The Postman examples are cool, but I can't figure out how to get it to create more than 1 host. I saw in the webinar that you can do it with a CSV file and the mgmt_cli command, can Postman pull from a CSV as well?
A side question, I think it would be really powerful if there was a tool that could take a management server database (migrate export or even a mgmt_cli command) that could give you the mgmt_cli commands to rebuild those objects, rules, policies, etc. on another management server. Can you do something like this with the Management API?
I just joined CheckMate's, there is some pretty good stuff here. Keep up the good work.
Aaron
- Mark as New
- Bookmark
- Subscribe
- Mute
- Subscribe to RSS Feed
- Permalink
- Report Inappropriate Content
I was informed that with Postman you can only create 1 host at a time.
- Mark as New
- Bookmark
- Subscribe
- Mute
- Subscribe to RSS Feed
- Permalink
- Report Inappropriate Content
The API only allows you do it one at a time.
I believe (though https://community.checkpoint.com/people/ubialbf7dd8c7-dd84-3fc4-99ca-eec4929a35ad can correct me if I'm wrong) that the CSV import option is unique to mgmt_cli.
Based on the API docs, it would have to call the API once per entry you want to create.
As far as dumping the current management database as mgmt_cli commands, this is not possible today.
- Mark as New
- Bookmark
- Subscribe
- Mute
- Subscribe to RSS Feed
- Permalink
- Report Inappropriate Content
I had someone who scripts better help me with this, but here is an easy solution
$ cat checkpoint_host_obj_api_create.sh
#!/usr/bin/env python
import argparse, socket, struct
parser = argparse.ArgumentParser()
parser.add_argument('inputFile', help = 'File that contains host IP addresses')
args = parser.parse_args()
inputFile = args.inputFile
with open(inputFile, 'r') as file:
input = file.read().split()
for i in input:
print 'add host name \"host_%s\" ip-address \"%s\"' %(i, i)
glipets@GLIPETS ~/unix/bin
$ cat sample.txt
10.1.1.1
10.2.2.2
glipets@GLIPETS ~/unix/bin
$ ./checkpoint_host_obj_api_create.sh sample.txt
add host name "host_10.1.1.1" ip-address "10.1.1.1"
add host name "host_10.2.2.2" ip-address "10.2.2.2"
Paste the output into SmartConsole CLI
- Mark as New
- Bookmark
- Subscribe
- Mute
- Subscribe to RSS Feed
- Permalink
- Report Inappropriate Content
I am getting a 403 error if I try to go to the API address https://<your-mgmt-ip-address>/api_docs/. I also get the same error when I try to run using the postman example
<!DOCTYPE HTML PUBLIC "-//IETF//DTD HTML 2.0//EN">
<html>
<head>
<title>403 Forbidden</title>
</head>
<body>
<h1>Forbidden</h1>
<p>You don't have permission to access /web_api/login on this server.
<br />
</p>
</body>
</html>
<html>
<head>
<title>403 Forbidden</title>
</head>
<body>
<h1>Forbidden</h1>
<p>You don't have permission to access /web_api/login on this server.
<br />
</p>
</body>
</html>
I cannot even use the management cli through PowerShell. I get the following error for that
message: "Error 403. Access to the API server is forbidden. Please check the Management API blade settings to make sure that the server is allowed to accept requests from this IP address."
code: "generic_error"
code: "generic_error"
The only place I can run management cli commands are from the smartConsole. I know I am using the correct credentials and I also can see in the logs the firewall is allowing the traffic through.
- Mark as New
- Bookmark
- Subscribe
- Mute
- Subscribe to RSS Feed
- Permalink
- Report Inappropriate Content
click publish after changed access settings in step 4
- Mark as New
- Bookmark
- Subscribe
- Mute
- Subscribe to RSS Feed
- Permalink
- Report Inappropriate Content
Hello Gary,
Thanks for your reply I have got this configuration now but previously I had it on "All IP addresses that can be used for GUI clients" and I was trying from the machine where I had smartConsole installed. I was hoping that that configuration to work.
- Mark as New
- Bookmark
- Subscribe
- Mute
- Subscribe to RSS Feed
- Permalink
- Report Inappropriate Content
It's possible using this setting that you ran into what appears to be a bug: https://community.checkpoint.com/message/7459-r8010-api-bug-fallback-to-smartcenter-only-after-reboo...
- Mark as New
- Bookmark
- Subscribe
- Mute
- Subscribe to RSS Feed
- Permalink
- Report Inappropriate Content
Hello Dameon,
Thanks for the information. I believe you are right.
- Mark as New
- Bookmark
- Subscribe
- Mute
- Subscribe to RSS Feed
- Permalink
- Report Inappropriate Content
Hey there,
I'm trying to connect to our management server via the web API. I did all the steps mentioned above, but I'm still unable to login with postman; I'm either getting a http/403 error (when trying to connect to the management server via its fqdn) or a http/405 error (when trying to connect to the management server via its short name). I can access the API documentation on the management server (https://name-of-the-management-server/api_docs) and the the cli-command "api status" tested the API readiness as "successful"; the IP of my client is also listed in the list of required IPs. It's also possible to connect to the management server via SmartConsole with the username/password I've used to connect to the web API.
Any idea what I've could be missing / what could be going wrong?
Philipp
- Mark as New
- Bookmark
- Subscribe
- Mute
- Subscribe to RSS Feed
- Permalink
- Report Inappropriate Content
Did you set the session?
--Juan
- Mark as New
- Bookmark
- Subscribe
- Mute
- Subscribe to RSS Feed
- Permalink
- Report Inappropriate Content
Hi Juan,
I found the problem. I could see in the logs on the management server (/var/log/httpd2_error_log) that Postman tried to connect to the management server via our proxy server, even though I disabled that feature in the settings. The IP of the proxy server isn’t allowed to access the management API, so the request was denied.
Since my installation of Postman won’t recognize its proxy settings I’m using this workaround:
- Start a cmd
- Go to the Postman directory (i.e. C:\Users<Your_Windows_Username>\AppData\Local\Postman\app-5.2.0)
- Issue the following commands:
set HTTP_PROXY=
set HTTPS_PROXY=
start Postman.exe
Postman will start, it won't use the proxy and I'm able to connect / login to the management server via the web API.
Philipp
- Mark as New
- Bookmark
- Subscribe
- Mute
- Subscribe to RSS Feed
- Permalink
- Report Inappropriate Content
Hi,
dont forget in Posman - settings - general - turn OFF validation SSL certificate or you wont be able to connect if certficate is untrusted.
- Mark as New
- Bookmark
- Subscribe
- Mute
- Subscribe to RSS Feed
- Permalink
- Report Inappropriate Content
Just to give everyone following this great guide a heads up, you would also need to turn off a few settings on Postman as described in the following link:
It won't work otherwise.
I hope this helps.
- Mark as New
- Bookmark
- Subscribe
- Mute
- Subscribe to RSS Feed
- Permalink
- Report Inappropriate Content
Hi... if i use an api call to show rules for example, and i need to show that on a web page.. how can i do that?
- Mark as New
- Bookmark
- Subscribe
- Mute
- Subscribe to RSS Feed
- Permalink
- Report Inappropriate Content
You’d have to write a program to translate the results of the API to a web page.
Or you can use the tool we’ve already created that does this: https://supportcenter.checkpoint.com/supportcenter/portal?eventSubmit_doGoviewsolutiondetails=&solut...
- Mark as New
- Bookmark
- Subscribe
- Mute
- Subscribe to RSS Feed
- Permalink
- Report Inappropriate Content
Updated main post with R82.10 Postman Collection link
Leaderboard
Epsum factorial non deposit quid pro quo hic escorol.
| User | Count |
|---|---|
| 1 | |
| 1 |
Upcoming Events
Tue 14 Jul 2026 @ 10:00 AM (PDT)
AI Security Masters E11: READY OR NOT: Securing the AI Enterprise 3/5 - AI Workforce SecurityThu 30 Jul 2026 @ 10:00 AM (PDT)
AI Security Masters E12: READY OR NOT: Securing the AI Enterprise 4/5 - AI GatewayThu 20 Aug 2026 @ 10:00 AM (PDT)
AI Security Masters E13: READY OR NOT: Securing the AI Ent 5/5 - AI Research & Threat LandscapeTue 14 Jul 2026 @ 10:00 AM (PDT)
AI Security Masters E11: READY OR NOT: Securing the AI Enterprise 3/5 - AI Workforce SecurityThu 30 Jul 2026 @ 10:00 AM (PDT)
AI Security Masters E12: READY OR NOT: Securing the AI Enterprise 4/5 - AI GatewayThu 20 Aug 2026 @ 10:00 AM (PDT)
AI Security Masters E13: READY OR NOT: Securing the AI Ent 5/5 - AI Research & Threat LandscapeAbout CheckMates
Learn Check Point
Advanced Learning
YOU DESERVE THE BEST SECURITY

©1994-2026 Check Point Software Technologies Ltd. All rights reserved.
Copyright
Privacy Policy
About Us
UserCenter